Golang on the PlayStation 2 (part 2)
By Ricardo

Holy shit
Welp, this is the first time I made to Hacker News and Hackaday. Even Reddit talked about it (twice!)! Well, this was fun! 😁
Thank y’all for the kind words, and I’m happy to know y’all are very excited about this too! So let’s dive right into it!
Ah, and you might be wondering: when will this be available? At the end of the post I do plan on sharing all the code, and I do plan on submitting a few PRs to TinyGo in the future. Sorry TinyGo devs for the future crazy code coming your way 😅
Disclaimer
There are a few disclaimers I have to make before we start:
- I will use images generated by AI tools, and a lot of this project involved AI tools to help me understand how the PS2 works behind the scenes.
- I am no expert in game development, or the PS2 in general. I’m learning with y’all as we go.
Now that this is out, let’s carry on.
Doing something useful
To test if this is actually working, I think it could be interesting to do something useful with the console. I did a lot of testing here and there to the point that it’s pretty much impossible to backtrack, as I didn’t write things down that much. I do, however, created a very simple game to test things: Flappy Gopher!
The idea is simple: create a very dumb implementation of a Flappy Bird clone. For that, I’ve set some requirements:
- It must have start and game over screens
- The bird must go up and down, possibly at different speeds
- There should be more than one pipe at the screen at a single point
- Collision must be implemented (so we can count points)
- We need to count points and have a high score
- Ideally the hole position should be randomized
Note: I’ll call bird and gopher interchangeably. Sorry.
Pretty simple stuff, no? Well…
Disclaimer: I am, by no stretch of the imagination, a game developer. I have now full respect for anyone who has ever worked on the PS2 because what the fuck Sony?!
Interfacing PS2SDK
Since I don’t want to reimplement ps2sdk’s huge code, I’ve opted to just use their functions and import them through CGo. There’s a pretty cool article I’ve read that helped me came up with the following approach to do it.
You see, a lot of the PS2 calls are done with structs. Let’s grab gsGlobal, defined here, for example:
struct gsGlobal
{
	s16 Mode;            ///< Display Mode
	s16 Interlace;       ///< Interlace (On/Off)
	s16 Field;           ///< Field / Frame
	u32 CurrentPointer;  ///< Current VRAM Pointer
	u32 TexturePointer;  ///< Pointer to beginning of Texture Buffer
	u8 Dithering;        ///< Dithering (On/Off)
	s8 DitherMatrix[16]; ///< Dithering Matrix
	u8 DoubleBuffering;	 ///< Enable/Disable Double Buffering
	u8 ZBuffering;       ///< Enable/Disable Z Buffering
	u32 ScreenBuffer[2]; ///< Screenbuffer Pointer Array
	u32 ZBuffer;         ///< ZBuffer Pointer
	u8 EvenOrOdd;        ///< Is ((GSREG*)CSR)->FIELD (Used for Interlace Correction)
	u8 DrawOrder;        ///< Drawing Order (GS_PER_OS/GS_OS_PER) (GS_PER_OS = Persitant objects always drawn first)
	u8 FirstFrame;       ///< Have we executed a frame yet?
	u8 DrawField;        ///< Field to draw (GS_FIELD_NORMAL/GS_FIELD_ODD/GS_FIELD_EVEN)
	u8 ActiveBuffer;     ///< Active Framebuffer
	volatile u8 LockBuffer;       ///< Used to lock the buffer so it doesn't switch
	int Width;           ///< Framebuffer Width (the mode's DW is a multiple of this value)
	int Height;          ///< Framebuffer Height (the mode's DH is a multiple of this value)
	int Aspect;          ///< Framebuffer Aspect Ratio (GS_ASPECT_4_3/GS_ASPECT_16_9)
	int OffsetX;         ///< X Window Offset
	int OffsetY;         ///< Y Window Offset
	int StartX;          ///< X Starting Coordinate (Used for Placement Correction) Default value
	int StartY;          ///< Y Starting Coordinate (Used for Placement Correction) Default value
	int StartXOffset;    ///< X Starting Coordinate (Used for Placement Correction) Additional correction
	int StartYOffset;    ///< Y Starting Coordinate (Used for Placement Correction) Additional correction
	int MagH;            ///< X Magnification Value (MAGH = DW / Width - 1)
	int MagV;            ///< Y Magnification Value (MAGV = DH / Height - 1)
	int DW;              ///< Total Display Area Width (DW = Width * (MAGH + 1))
    int DH;              ///< Total Display Area Height (DH = Height * (MAGH + 1))
	GSBGCOLOR *BGColor;  ///< Background Color Structure Pointer
	GSTEST *Test;        ///< TEST Register Value Structure Pointer
	GSCLAMP *Clamp;      ///< CLAMP Register Value Structure Pointer
	GSQUEUE *CurQueue;   ///< Draw Queue (Current)
	GSQUEUE *Per_Queue;  ///< Draw Queue (Persistent)
	GSQUEUE *Os_Queue;   ///< Draw Queue (Oneshot)
	int Os_AllocSize;    ///< Oneshot Drawbuffer Size (Per Buffer)
	int Per_AllocSize;   ///< Persistent Drawbuffer Size (Per Buffer)
	void *dma_misc __attribute__ ((aligned (64)));	///< Misc 512 byte DMA Transfer Buffer (so we don't malloc at runtime)
	int PSM;             ///< Pixel Storage Method (Color Mode)
	int PSMZ;            ///< ZBuffer Pixel Storage Method
	int PrimContext;     ///< Primitive Context
	int PrimFogEnable;   ///< Primitive Fog Enable
	int PrimAAEnable;    ///< Primitive AntiAlaising Enable
	int PrimAlphaEnable; ///< Primitive Alpha Blending Enable
	u64 PrimAlpha;       ///< Primitive Alpha Value
	u8  PABE;            ///< Choose if to do Alpha Blend on a Per-Pixel Basis
};
typedef struct gsGlobal GSGLOBAL;
This is a massive struct, with nested things, alignments and all sort of crazy things I don’t want to deal with in Go. Plus, most of the time, I’d be using just a few of those fields anyway. So I took a simple approach to use it:
package gskit

/*
#define _EE
#include <gsKit.h>
*/
import "C"
import "unsafe"

type GSGlobal struct {
	native *C.struct_gsGlobal

	// NOTE: this definitely does not include all the fields.
	Width           uint32
	Height          uint32
	PSM             int
	PSMZ            int
	DoubleBuffering bool
	ZBuffering      bool
	PrimAlphaEnable bool
	PrimAlpha       uint64
}

func (g *GSGlobal) toNative() *C.struct_gsGlobal {
	g.native.PSM = C.int(g.PSM)
	g.native.PSMZ = C.int(g.PSMZ)
	g.native.Width = C.int(g.Width)
	g.native.Height = C.int(g.Height)
	g.native.DoubleBuffering = boolToCuchar(g.DoubleBuffering)
	g.native.ZBuffering = boolToCuchar(g.ZBuffering)
	g.native.PrimAlphaEnable = boolToCint(g.PrimAlphaEnable)
	g.native.PrimAlpha = C.ulonglong(g.PrimAlpha)
	return g.native
}
Basically what happens is that we have now:
- A Go struct that has a pointer to the native one in C
- A method
toNative()that will update the C struct and return its pointer
The reason why the toNative() is necessary is that a lot of the C functions will expect it:
void gsKit_sync_flip(GSGLOBAL *gsGlobal);
So, for wrapped functions, I just expect my own struct and will call toNative() on it:
func SyncFlip(g GSGlobal) {
	C.gsKit_sync_flip(g.toNative())
}
Doing it this way I guarantee that any calls that:
- Any calls expecting a
*GSGLOBALwill receive a pointer of it - The call will receive an up-to-date version of the struct, with the latest changes on the Go side of things
- We’ll be satisfying the prototype by using the proper types instead of
void*
You may also notice that toNative() is private to the packaged - this is intentional, as I want to keep everything wrapped in their own pretty packages and avoid exposing unnecessary C stuff to the outside world.
This worked really well, up to a certain point. In some very specific cases, where an initialization function (ie. a function to create an instance of the struct) is not available, I’ve opted to allocate the memory for it. I’ve tried just setting it as part of the Go code but it somehow failed - I wonder if my stack is messed up somehow. For example, for GSTEXTURE structures, I’ve done this:
type GSTexture struct {
	native *C.struct_gsTexture

	Width  uint32
	Height uint32
	PSM    int
	Clut   unsafe.Pointer
	VRAM   uint
	Mem    unsafe.Pointer
	Filter uint32
}

func NewGSTexture() GSTexture {
	ptr := unsafe.Pointer(C.calloc(1, C.size_t(unsafe.Sizeof(C.struct_gsTexture{}))))
	return GSTexture{
		native: (*C.struct_gsTexture)(ptr),
	}
}
Note: since my code won’t be doing hot loading of textures, I don’t need to care about freeing that memory.
This approach worked really well, and I can just use NewGSTexture() whenever I want to initialize the struct for a new texture. We’re basically working with an object at this point. Ah, and the toNative() works the same way.
Loading textures
Speaking of textures, you might be wondering how can I load them into memory. You may want to sit down for this explanation.
Texture format
Ah, the texture format. This is so annoying, and I’ve spent way too many hours into this. Essentially I use PNGs for my textures, but the code load them as RAW RGBA8888 (GS_PSM_CT32 in the ps2sdk) image files - meaning they are just raw files, each pixel being represented by 4 bytes (R, G, B and Alpha).
To convert from PNG into RAW I just used ChatGPT. Yeah, dumb, I know, but I was too lazy to figure out a tool for that. I’m pretty sure I could write one or even get ChatGPT to do it for me, or just fine something that does that automatically, but I was too lazy. Plus, the PS2 has some quirks regarding its alpha values - seems like it only wants 0x80 as a maximum instead of 0xFF? Regardless, it was an easy approach.
Ah, and I never got the transparency to work - hence the fact background is currently disabled in the game. That means that technically speaking I could just use RGB888 (GS_PSM_CT24 in the ps2sdk) instead, which would cause the textures to be smaller. But meh, not worth the effort at the moment.
Adding to the binary
For simplicity, I’ve opted to load all textures and other resources (including IRX modules for the IOP - more on that later) as embedded data within the binary. For that, there’s a neat trick you can do: store them as arrays in C.
To make that happen, all you gotta do is convert the binary file into a C array, and then build it as an object. This is done with the following commands:
$ bin2c texture.raw texture.c my_texture
$ mips64r5900el-ps2-elf-gcc texture.c -c -o texture.o
This will create a C file (and later an object one) with 2 variables we can use:
unsigned char *my_texture;
unsigned int size_my_texture
These can easily be used in CGo by just using them as extern and letting the linker deal with that. It works great and it’s simple enough. Ideally you probably want to load them from somewhere else as the whole ELF gets loaded into RAM (I think), and thus your loaded textures can become a bottleneck/unnecessary RAM usage.
But you might ask: “what do you mean by unnecessary RAM usage, don’t I need them?” - and you would be right into thinking so, but not really? Let me show you how they actually get used.
Uploading and using textures
To actually use a texture, you need to first load it into the GS (Graphics Synthesizer - aka our GPU). You see, the texture, to be used, needs to be at the VRAM (video RAM), not the CPU RAM (or EE RAM in this case). For that, you need to do a DMA operation using the GIF (Graphics Interface), which is how you transmit data from the EE to the GS.
Note: you can read more about this here.
It’s weird, but it kinda makes sense. Basically this is what we want to do:
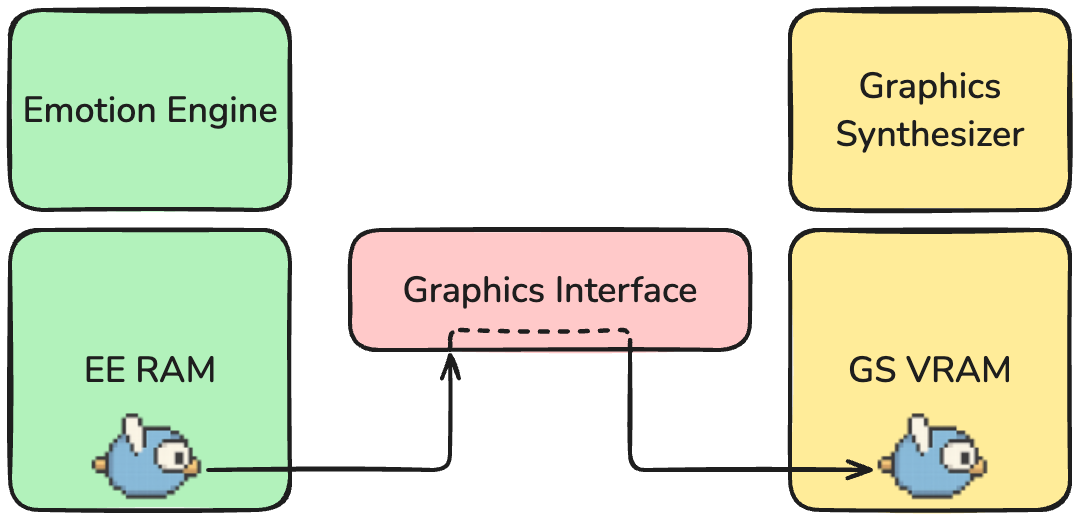
For that, all we need to do is setup the texture and upload it. Simple, right?
/*
extern unsigned char *gopher;
*/
import "C"

func loadGopherTexture() {
	gopherTex = gskit.NewGSTexture()

	// Set width, height, 32-bit format.
	gopherTex.Width = 256
	gopherTex.Height = 256
	gopherTex.PSM = gskit.GS_PSM_CT32

	// No smoothing
	gopherTex.Filter = gskit.GS_FILTER_NEAREST

	// No Color Lookup Table (CLUT) (EE RAM)
	gopherTex.Clut = nil

	// Point to our texture data (EE RAM)
	gopherTex.Mem = unsafe.Pointer(&C.gopher)

	// Allocate the VRAM on GS (GS RAM)
	textureSize := gskit.TextureSize(gopherTex.Width, gopherTex.Height, gopherTex.PSM)
	gopherTex.VRAM = gskit.VRAMAlloc(gsGlobal, textureSize, gskit.GSKIT_ALLOC_USERBUFFER)

	// Load the texture data into VRAM
	gskit.TextureUpload(gsGlobal, gopherTex)
}
Basically, what this is doing is:
- Setup the structure by telling this is a 256x256 RAW RGBA8888 image
- Set filter to nearest, no color lookup table
- Point
Memto ourgophersymbol, exposed by the previosly added texture from the step before - Allocate VRAM (
gsKit_vram_alloc) for our texture - Upload the texture (
gsKit_texture_upload)
I’m almost sure that, at this point, we could unload the texture from EE RAM, but since ours is embedded into the final ELF file, this makes no sense to do anyway.
Easy, right? :) (only took me like a whole day to get it to work….)
Now, to use, all you gotta do is call gsKit_prim_sprite_texture_3d from the ps2sdk (or our wrapper in this case), like this:
	gskit.PrimSpriteTexture3D(
		gsGlobal,
		birdTex,                                                // our gopher/bird texture
		0, int32(birdY), 1,                                     // start screen coordinates (X, Y, Z)
		int32(textureX), 0,                                     // start texture coordinates (X, Y)
		int32(birdTex.Width/2), int32(birdY+birdTex.Height), 1, // end screen coordinates (X, Y, Z)
		int32(textureX+birdTex.Width/2), int32(birdTex.Height), // end texture coordinates (X, Y)
		gskit.GS_SETREG_RGBAQ(0x80, 0x80, 0x80, 0x80, 0x00),    // color mask? (RGBAQ) - max value is 0x80
	)
This will queue up draw operation for that texture into the GS. Then, once the queue is executed, it will get drawn. But speaking of queueing things into the GPU, let’s talk about the game implementation a bit - trust me, it will make a lot more sense.
Game implementation
Again, not a PS2 game developer (or even a game developer of any kind!), so take all of this section with a grain of salt.
The actual game implementation is not that complex. It’s a simple state machine with only 3 states:
- At the menu screen (
Menu) - In game (
InGame) - At the game over screen (
GameOver)
First of all, you need to understand that the game is constantly running in an infinite loop. At every execution of it, it will draw the current frame, depending on all the states of the game.
The code works the following way:

Basically what happens is that we initialize everything we need, and then we start the loop. At the loop, for states 1 and 3 (Menu and GameOver) we just look for the Start button press and draw their frames. For state 2 (InGame), however, we do a few extra things:
- Adjust the bird Y position
- If jumping, go up, otherwise go down.
- When jumping, there is a limit on how high the jump lets you go. If we reached/crossed that threshold, we now change our state to falling instead.
- Move the pipes left a bit.
- If a pipe is outside the screen to the left, move it all the way to the right.
- Otherwise, just decrease their X position and carry on.
- If the bird fell out of the screen, it’s game over.
- Here we just update the game state and return, we do not continue drawing the frame.
- If the bird collided with any pipe on the screen, it’s game over.
- Same here, no actual frame draw, just game state update.
Once the game logic has been executed, we start queuing up draw operations.
Drawing the bird
The bird texture will vary depending on the logic: if it is going down, we’ll draw the texture with its wings up, but if it’s jumping, the wings would be facing down. For that, we actually have a single texture with both images side by side:

What we do then is split the image in half when drawing and only draw the part we want:
	// Draw the Gopher. Width 0 to 64 is it going down, width 65 to 128 is it going up.
	textureX := uint32(0)
	if isGoingUp {
		textureX = birdTex.Width/2 + 1
	}
	gskit.PrimSpriteTexture3D(
		gsGlobal,
		birdTex,
		0, int32(birdY), 1,
		int32(textureX), 0,
		int32(birdTex.Width/2), int32(birdY+birdTex.Height), 1,
		int32(textureX+birdTex.Width/2), int32(birdTex.Height),
		gskit.GS_SETREG_RGBAQ(0x80, 0x80, 0x80, 0x80, 0x00),
	)
Cool trick, right? This saves us from loading another texture. We can use this tricky for a bunch of other things too. Fun fact, fonts do the same thing, all letters side by side!
Drawing the pipes
For the pipes, we do something pretty cool alongside the texture splitting. Here’s their texture:

What we do here is weird but works: we split the screen into 7 sections (0 to 6), each one being 64 pixels tall, as the PS2 has a resolution with a height of 448 pixels. So what we do is we randomize the pipe hole location (under certain conditions so the game is still possible to play lol) and draw according to this rule:
- If it’s the pipe body, draw the body texture.
- If it’s the pipe edge (right before/after the hole), draw the pipe edge texture.
- If it’s within the hole, draw nothing.
It basically looks like this:
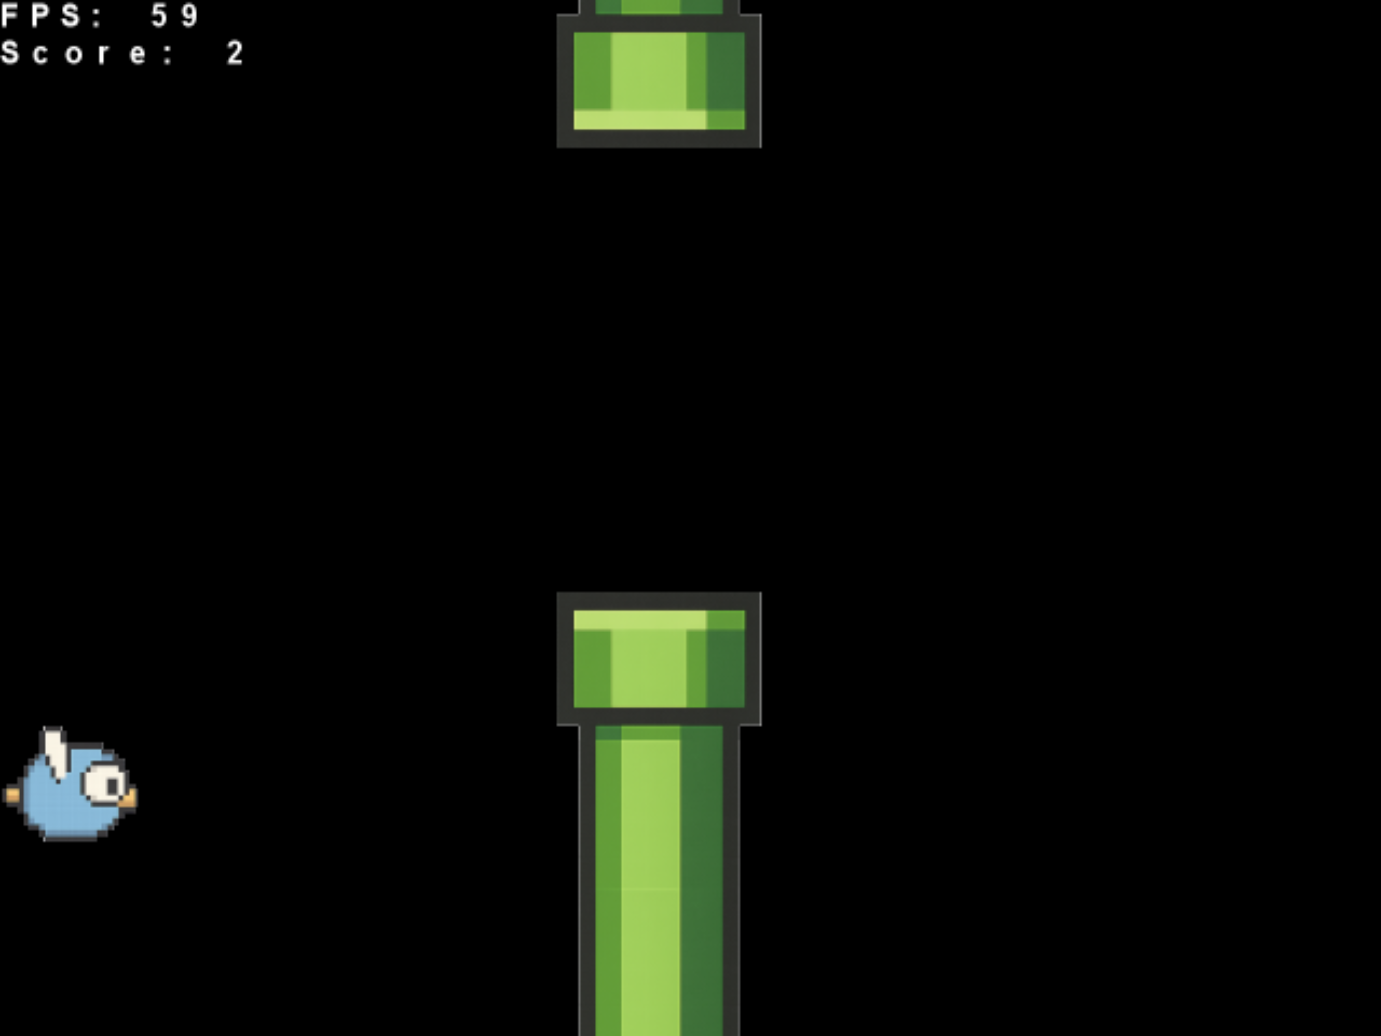
After it, we’ll just we draw (ie. write) the score and that’s it. Or is it?
The Queue
Remember when I said things work in a queue? Every GS operation we do is actually queued up for execution. On the drawFrame() function, we handle this like this:
func drawFrame() {
	// Sync & flip (not on first frame though)
	gskit.SyncFlip(gsGlobal)

	// Set buffer active
	gskit.SetActive(gsGlobal)

	// Clear the buffer
	gskit.Clear(gsGlobal, 0x00, 0x00, 0x00, 0x80, 0x00)

	if gameState == Menu {
		drawMenu()
	} else if gameState == InGame {
		drawInGame()
	} else {
		drawGameOver()
	}

	// Draw the FPS counter
	drawFPS()

	// Push the draw commands to the GS
	gskit.QueueExec(gsGlobal)
}
Since we activated double buffering (to avoid even more artifacts), the first step is to flip between buffer A and B. On the first frame draw this doesn’t happen. Once that is done, we activate the new buffer and clear it. Then we do the drawing operations depending on the state, and finally draw the FPS.
Remember, until now, all the draw operations were not being actually executed, but queued to be executed. The final command, however, is where the magic happens: it executes the queue, making the GS actually execute the operations and show stuff at the screen - like magic!
The final result
First of all, here’s the code:

And here’s the binary if you don’t want to deal with building it yourself (as it needs a custom version of TinyGo for now): flappygopher-20250420.elf.
That said, here’s a video of the game running on PCXS2 (v2.3.281):
Oh, but wait, there’s more! I also ran it on a real PlayStation 2! Yup, for real! Someone commented they wanted to see this, and it makes sense, things get a lot more complex on the real hardware. With that, here’s a video of the game running on my PlayStation 2 (SCPH-90006):
Please excuse the terrible capture setup. I’m capturing this over standard composite video, hence the terrible image quality. My PS2 has a modchip and I used that to load ps2link from the memory card. From there, I just uploaded the latest build from my Mac with ps2client.

Finally.
Nothing is perfect and everything is broken
Sigh. Well, there were a lot of problems and I learned a lot from them. So here’s a breakdown of all of them, or at least the ones I remember. The reason why I’m writing them down is because these are definitely things I look forward on fixing on future parts!
Missing CGO_CFLAGS
One of the neat tricks we can do on CGo is to have global CFLAGS. This is important as I need to add a bunch of include paths so that includes like these work:
// Required for tamtypes, imported by other headers.
#define _EE
#include <stdlib.h>
#include <kernel.h>
An easy way out is to just do this:
/*
#cgo CFLAGS: -I/..../ps2dev/ee/mips64r5900el-ps2-elf/include -I(so many other paths)

// Required for tamtypes, imported by other headers.
#define _EE
#include <stdlib.h>
#include <kernel.h>

// (...)
*/
import "C"
However, this doesn’t scale well. well, for starters, it sucks to maintain, as it’s a shit ton of paths. No, really, you’ll see later how many there are. Second, it’s very annoying to manage them.
I thought about using env vars, but it seems like CFLAGS isn’t being picked up by CGo. That’s alright: we can use CGO_CFLAGS for that! According to CGo’s docs:
When building, the CGO_CFLAGS, CGO_CPPFLAGS, CGO_CXXFLAGS, CGO_FFLAGS and CGO_LDFLAGS environment variables are added to the flags derived from these directives.
Lovely! Trying that, however, didn’t do anything. Turns out TinyGo hasn’t implemented that yet, or at least I couldn’t get it to work. So I patched TinyGo’s CGo to add support for it.
This was mostly straightforward. Inside the Process method (here), I’ve added these lines inside the for loop:
	for i, f := range files {
		var cgoHeader string
		for i := 0; i < len(f.Decls); i++ {
			// (...)
		}

		cGoCFlags := os.Getenv("CGO_CFLAGS")
		if cGoCFlags != "" {
			flags, err := shlex.Split(cGoCFlags)
			if err != nil {
				panic(err.Error())
			}
			p.makePathsAbsolute(flags)

			p.cflags = append(p.cflags, flags...)
		}

		p.cgoHeaders[i] = cgoHeader
	}
It ain’t pretty, for sure, but it does the trick. Technically I should also add support for all the other env vars, but I couldn’t be bothered at the moment. Later one I’ll tackle this on a proper pull request to the project. A quick recompile of TinyGo, and sure enough, now it can find all the includes without manually overriding them on each file!
Ah, and here’s the list of includes I use, to give you an idea of how many there are and how annoying there were to maintain:
CGO_CFLAGS = \
    -I$(PS2DEV)/ee/lib/gcc/mips64r5900el-ps2-elf/14.2.0/include/ \
    -I$(PS2DEV)/ee/mips64r5900el-ps2-elf/include \
    -I$(PS2DEV)/gsKit/include \
    -I$(PS2DEV)/ps2sdk/common/include \
    -I$(PS2DEV)/ps2sdk/ee/include \
    -I$(PS2DEV)/ps2sdk/ports/include/freetype2 \
    -I$(PS2DEV)/ps2sdk/ports/include/zlib
Packed attribute
Inside some of ps2sdk’s files, there are some structs with a packed attribute (source):
struct padButtonStatus
{
    // ... fields ...
} __attribute__((packed));
According to ChatGPT, these are used to tell the compiler to not add any padding to the structs. This often used for performance reasons (memory alignment and stuff), but with anything low-level or cross-architectures, this is not recommended. As such, ps2sdk disables it on a ton of structs.
The thing is, the Clang compiler used by TinyGo to build CGo code doesn’t handle that well. Like, at all:
../ps2dev/ps2sdk/ee/include/libpad.h:119:18: expected FieldDecl in struct or union, not attribute(packed)
There are two quick approaches here:
- Change the header file. I control it, I can disable it.
- Disable the attribute.
I didn’t want to pick the first option as that would make my code annoying to build into other envs, plus possibly making my ps2sdk misbehave, so I’ve opted for the latter. Here’s the actual solution:
/*
#define __attribute__(x) // libpad doesn't play nice with clang.
#include <libpad.h>

*/
import "C"
Mind you, this is a terrible idea. I’m not 100% sure why it works here, but it also doesn’t seem to misbehave, at least not in a way that I could test so far. Since only a few structs need this, I’m totally ok with this hack, but this can cause unpredictable behavior, specially when exchanging data between the C code compiled by ps2sdk’s GCC and the one compiled within CGo with Clang.
So, please, don’t do it. Or do it, I won’t judge you. And yes, it worked!
IOP modules
On ps2sdk you can use libpad to get inputs from the controllers, as well as detect their state, etc. It’s a pretty cool API and very simple to use. However, due to the architecture of the PS2, this is not handled by the EE (Emotion Engine - your main CPU) processor, but the IOP (Input/Output Processor). This is a separate CPU, and you need to somehow communicate with that.
You can read more about this hell here.
I’m not gonna pretend I fully understand the magic here - I definitely do not. Buuut, the IOP processor needs some code so that things communicate correctly on both ends (between EE and IOP). Code-wise, this is not that complicated, as all you need to do is load some specific ones - in my case, the ones needed by libpad: SIO2MAN and PADMAN.
Seems simple enough. Let’s create a wrapper for the C function call:
/*
#define _EE
#include <stdlib.h>
#include <kernel.h>
#include <sifrpc.h>
#include <loadfile.h>
#include <sbv_patches.h>
#include <iopcontrol.h>
*/
import "C"

func LoadModule(path string) {
	cPath := C.CString(path)
	defer C.free(unsafe.Pointer(cPath))

	ret := int(C.SifLoadModule(cPath, 0, nil))
	debug.Printf("Load module: %s, %d\n", path, ret)
}
And then call it:
LoadModule("rom0:SIO2MAN")
LoadModule("rom0:PADMAN")
And done! Except… it isn’t. For some reason, this didn’t work on my real PS2 (yeah yeah, more on that later). A lot of trial and error later led me to believe that those modules could be either missing or incompatible with my game - except that this didn’t make any sense.
You see, I actually made a quick test, and it worked?
This made me wonder a lot, and I ended up going into a very deep rabbit hole.
⚠️ Before we continue, a warning! This was unnecessary and the code works just fine with
SIO2MANandPADMAN. It was broken because ofdefer(more on that later). But for the sake of full disclosure, I’ll write up what I’ve done.
By assuming that those modules were somehow missing from rom0, I decided to load them from RAM. First step is to embed them, like any texture, by using bin2c, compiling it into an object file and just adding it to the final build. Then, we just need to load them, right?
/*
// Modules
extern unsigned char *sio2man;
extern unsigned int size_sio2man;
extern unsigned char *padman;
extern unsigned int size_padman;
*/
import "C"

func LoadModuleBuffer(ptr unsafe.Pointer, size int) {
	ret := int(C.SifExecModuleBuffer(ptr, C.uint(size), C.uint(0), nil, nil))
	debug.Printf("Load module buffer:%d\n", ret)
}

func LoadModules() {
	sifrpc.LoadModuleBuffer(unsafe.Pointer(&C.sio2man), int(C.size_sio2man))
	sifrpc.LoadModuleBuffer(unsafe.Pointer(&C.padman), int(C.size_padman))
}
This didn’t work. It gave me a weird result on all calls on the emulator, and even crashed the console on real hardware. Further investigation led me into the weirdest shit I’ve ever seen so far on this console: patching Sony’s bad implementation.
Turns out Sony messed up and somehow LoadModuleBuffer doesn’t work. According to PS2SDK docs:
The
rom0:LOADFILERPC service is missing support for LoadModuleBuffer, making it impossible (by default) to IOP load modules from EE RAM.
Here’s someone getting stuck on the same problem. Thanks Sony!
Cool, so now let’s patch it. Following the suggested instructions from the link above, I took this route:
/*
#define _EE
#include <stdlib.h>
#include <kernel.h>
#include <sifrpc.h>
#include <loadfile.h>
#include <sbv_patches.h>
#include <iopcontrol.h>

static int resetAndPatchIOP()
{
	SifInitRpc(0);
	while(!SifIopReset("", 0)){};
	while(!SifIopSync()){};
	SifInitRpc(0);

	int ret = sbv_patch_enable_lmb();
	if (ret != 0) {
		return ret;
	}

	return sbv_patch_disable_prefix_check();
}
*/
import "C"

func ResetAndPatchIOP() {
	ret := C.resetAndPatchIOP()
	debug.Printf("ResetAndPatchIOP: %d\n", int(ret))
}
Then, on the game’s main() function, I did this:
func main() {
	debug.Init()

	sifrpc.ResetAndPatchIOP()
	sifrpc.LoadModuleBuffer(unsafe.Pointer(&C.sio2man), int(C.size_sio2man))
	sifrpc.LoadModuleBuffer(unsafe.Pointer(&C.padman), int(C.size_padman))

	// (...)
}
Nothing too crazy. That fixed the problem for the emulator, but not for the real console. After further research, I’ve switched SIO2MAN with FREESIO2 (a replacement for XSIO2MAN) and PADMAN with FREEPAD (a replacement for XPADMAN), and that solved the problem completely.
Or did it?
See, that defer on the C.Free call inside the LoadModule wrapper we created - it crashes on real hardware, but works just fine on the emulator. My guess is that it is generating an invalid instruction, which seems to crash the PS2, while the emulator just ignores it.
Yeah… rewriting it to just do the C.free at the end fixed the problem. Go figure.
A deferred crash
As you already know from the previous section, the defer keyword is not working properly. Right now it crashes real hardware, so we won’t be using it. Ironically it works great on the emulator, so there’s that. A bit problematic as we could end up importing libs that will use it, and that will make things crash!
For now, I’ve opted to just not use it. However, we will have to come back to this and properly implement (or disable) it.
Numbers aren’t numbering
You can see that in a lot of places in the code I’m using int32 and uint32. This is intentional, as using int can cause some weirdness, specially when it tries to convert an int64 to/from int32. The arithmetic section of this problem has been solved, but casting seems to be broken still.
On the emulator, however, things work perfectly, but it crashes the game on the real hardware. So, for the sake of simplicity and keeping my sanity, I’m intentionally defining how many bits integers have on most of the code. Obviously there are parts that an integer of 64bits is required (unsigned long long, or u64 on the ps2sdk), but those seem to work as intended.
A similar problem happens with float, specially when converting 1.0 to float. I believe that it somehow gets set as float64, and that conversion is definitely unsupported at the moment. Because of that, I’ll use float32 whenever I can, and even convert integers to float using C code instead:
/*
#include <stdlib.h>
#define _EE
#include <gsKit.h>
#include <gsToolkit.h>

float intToFloat(int i) {
	return (float)i;
}
*/
import "C"

func PrimSpriteTexture3D(
	gs GSGlobal,
	tex GSTexture,
	x1, y1 int32, iz1 int32, u1, v1 int32,
	x2, y2 int32, iz2 int32, u2, v2 int32,
	mask uint64,
) {
	C.gsKit_prim_sprite_texture_3d(
		gs.toNative(),
		tex.toNative(),
		C.intToFloat(C.int(x1)), C.intToFloat(C.int(y1)), C.int(iz1),
		C.intToFloat(C.int(u1)), C.intToFloat(C.int(v1)),
		C.intToFloat(C.int(x2)), C.intToFloat(C.int(y2)), C.int(iz2),
		C.intToFloat(C.int(u2)), C.intToFloat(C.int(v2)),
		C.ulonglong(mask),
	)
}
Clock has no battery
I never fully implemented the calls for clock in the TinyGo’s PS2 code. That means that time.Now() is probably not functional. To avoid doing that, we can just use wrappers from C code like this:
package clock

/*
#include <time.h>
*/
import "C"

const (
	CLOCKS_PER_SEC = 1000000
)

func Now() uint64 {
	return uint64(C.clock())
}

Next steps
I learned a lot throughout this process, but most of this game was actually implemented in just a few days. This is a good start for this project, and definitely shows that, even though it’s far from being stable or mature in any way, it’s already mostly functional, and all of this with little hacks into the TinyGo’s codebase.
However, there is a shit ton of stuff that is still missing:
- Proper, fully-functional 64-bit integers
- Functional 64-bit floating point numbers
- Better error handling in general
- A proper
panic(right now it panics and carries on with the code lol wut) - A functional
deferimplementation - A proper clock implementation
And a lot more! But that will have to wait until next parts - which are already cooking. Until then, keep hacking!