Golang on the PlayStation 2 (part 1)
By Ricardo

I always wanted to do some weird stuff with consoles. I’m not sure why, but making devices do unexpected things is always an interesting topic for me. And the same applies to the PlayStation 2, the 2000 console released by Sony.
Also, Sony, don’t sue me for this lol
Let’s get straight into it: I want to run code into consoles (more on why this in a future post). Normally this is done in low(er) level languages, but nowadays we have better and easier to work with languages such as Go. So I was wondering.. why not?
Looking online, however, yielded no easy way of doing this, so I decided to tackle this problem myself.
Please note that I’m writing this after a lot of the research here has been done and tested already. This means that a lot of the experimentation here is from memory and from retracing my steps, so there might be inconsistencies here and there.
Also note that this is all running inside an emulator. I do own a PS2 that I can test this, but I’m too lazy to set it up. Plus I want fully functional demos before doing so.
Final note: the code will be released at a later point and I’ll update the post accordingly.
The challenge
By default, Go only supports a handful of platforms, and unfortunately that does not include the PS2. In fact, Go seems to require an OS behind the scenes, thing that we don’t even have over there (not considering PS2 Linux). To solve that, however, we have TinyGo, a Go compiler for small devices, like microcontrollers and embedded systems. The basic way it works is that it gets the Go code, turns into LLVM IR, and then that into the binary code for whatever target we’re trying to code for.
The PS2 main CPU is called Emotion Engine, which is based on a MIPS R5900. It implements the instructions for MIPS-III and MIPS-IV, plus some custom stuff. It also is missing a few other things (more on that later). Go can actually build code for MIPS already, which should save me some time, but not a lot, as I need to get TinyGo to work on it. TinyGo relies on LLVM 19, which does support MIPS-III, but not the R5900 CPU directly.
These are all technical issues. There’s a much more pressing one: I don’t know how the PS2 works.
The ps2dev SDK and its quirks
If you look it up online for a way of developing code for the PS2, you’ll probably cross paths with ps2dev. This is a full-blown SDK that lets you generate binaries for it in a pretty neat way. The coolest thing about it is that it already provides a bunch of libraries for graphical operations, debugging, I/O, etc - even a stdlib is provided! Because of that, I thought: hey, maybe I want to link to their code - this would allow an easier and faster implementation of anything for the PS2 in Go. Think of it as an “OS” API (technically it’s not?), which we could call whenever we want to do things we don’t want to reimplement (or that aren’t even worth trying sometimes).
That said, this introduces a few problems. The first one is that the ps2dev libraries are compiled to the MIPS-III N32 standard. This means that, whatever code we produce, needs to target the same thing. Same hard-float, same N32 ABI, etc. This is a bit annoying, but manageable. The reason why it needs to match is because we’ll be linking our code to their pre-built libraries, and linkers are not really fond of dealing with different targets.
For the sake of clarification: MIPS-III N32 means that this is targeting a MIPS CPU that is implementing the MIPS-III instruction set. This is a 64bit CPU, but due to the N32, this is running 32bit code with some 64bit instructions to handle 64bit integers. This is very confusing, but you can check this to read more about it.
Because of this, you’ll see my attempts to target mipsel with a mips3 CPU in the next steps, even though it should, technically speaking, be a mips64el, as this is a 64bit CPU. N32 should force things to run in 32bit mode, even though though our target should support 64bit code. However, Clang/LLVM and TinyGo get kinda messy on this and it gets very confusing and complicated. Also, building for mips64el caused TinyGo to failed some verification steps when generating code with the LLVM, as well as clang to refuse to properly build it as the code is kinda broken. Since I really wanted to move forward, I gave up and opted for generating mipsel code with the N32 ABI, which will force clang to change it to a MIPS64 internally, but still generate valid code. Like I said, it’s very weird. Please bear with me, this is all new to me too! :D
Further reiteration on this topic might be necessary to get this just right, but I’m not diving into this hell right now. Future-wise we can try dropping ps2dev and doing things directly in Go, but some assembly is required - literally and metaphorically.
Getting TinyGo to generate some code
For TinyGo to know about a certain target, it requires a file defining it - we’ll call it ps2.json. It defines a bunch of very interesting things that we don’t really care at the moment, but here are the most important ones:
{
	"llvm-target": "mipsel-unknown-unknown",
	"cpu": "mips3",
	"features": "-noabicalls",
	"build-tags": ["ps2", "baremetal", "mipsel"],
	"goos": "linux",
	"goarch": "mipsle",
	"linker": "ld.lld",
	"rtlib": "compiler-rt",
	"libc": "",
	"cflags": [
	],
	"ldflags": [
	],
	"linkerscript": "",
	"extra-files": [
	],
	"gdb": []
}
This file is the culmination of many, maaany days testing different configurations. It is only partially functional. It cannot generate object files yet (more below), hence the reason why I’m not bothering to fill in flags for compiling and linking code. There are some relevant things I need to explain, though, so here we go:
- Target is
mipsel-unknown-unknown. This is our LLVM target. I’m sticking withmipselhere for the reasons I explained previously. - The features have
-noabicalls. It is required as otherwise shit hits the fan and nothing works (the LLVM IR that gets generated gets broken). - I’ve set it to not use any
libc. This is because ps2dev already provides one, and I don’t want to mess with that (trust me). Plus, since we’ll be linking to their code, we might as well use their version of it.
This is the basic target file we need so that TinyGo at least knows what a PS2 is. But that’s not all - we need to define a bunch of functions which are target-specific.
Baremetal definitions
Our target needs a baremetal configuration - baremetal_ps2.go. Usually the default baremetal file is enough, but in our case I’ve opted to create a custom one so that I can redefine some things.
Note from the future: this can be improved by adjusting the linker file so it finds the correct externs. I might end up doing that and come back here later on.
//go:build ps2

package runtime

import "C"
import (
	"unsafe"
)

//go:extern _heap_start
var heapStartSymbol [0]byte

//go:extern _heap_end
var heapEndSymbol [0]byte

//go:extern _fdata
var globalsStartSymbol [0]byte

//go:extern _edata
var globalsEndSymbol [0]byte

//go:extern _stack_top
var stackTopSymbol [0]byte

var (
	heapStart    = uintptr(unsafe.Pointer(&heapStartSymbol))
	heapEnd      = uintptr(unsafe.Pointer(&heapEndSymbol))
	globalsStart = uintptr(unsafe.Pointer(&globalsStartSymbol))
	globalsEnd   = uintptr(unsafe.Pointer(&globalsEndSymbol))
	stackTop     = uintptr(unsafe.Pointer(&stackTopSymbol))
)

func growHeap() bool {
	// On baremetal, there is no way the heap can be grown.
	return false
}

//export runtime_putchar
func runtime_putchar(c byte) {
	putchar(c)
}

//go:linkname syscall_Exit syscall.Exit
func syscall_Exit(code int) {
  	// TODO
	exit(code)
}

const baremetal = true

var timeOffset int64

//go:linkname now time.now
func now() (sec int64, nsec int32, mono int64) {
	mono = nanotime()
	sec = (mono + timeOffset) / (1000 * 1000 * 1000)
	nsec = int32((mono + timeOffset) - sec*(1000*1000*1000))
	return
}

func AdjustTimeOffset(offset int64) {
	timeOffset += offset
}

var errno int32

//export __errno_location
func libc_errno_location() *int32 {
	return &errno
}
Do we need to understand how most of this works? No, we don’t. Not only that, most of this is copy-paste from the normal baremetal.go implementation. We can adjust later if necessary, no worries. Like I said, we mostly need this to build, so that we can figure out what is wrong and fix it accordingly.
Note: for this to work, you still need to disable the building of the original
baremetal.gofor our target, so we need to change its build flag to//go:build baremetal && !ps2.
Runtime
Our target needs a runtime definitions file - runtime_ps2.go. This is the place where a bunch of target-specific functions get defined, including how putchar, exit and even main (later) gets implemented. Pretty cool part of the code if I’d say so.
A very basic implementation would look like this:
//go:build ps2

package runtime

/*
extern void _exit(int status);
extern void* malloc(unsigned int size);
extern void free(void *ptr);
extern void scr_printf(const char *format, ...);
*/
import "C"
import "unsafe"

// timeUnit in nanoseconds
type timeUnit int64

func initUART() {
  // Unsupported.
}

func putchar(c byte) {
	// This is a very hacky way of doing this. It assumes the debug screen is already active, and prints
	// a whole string for a single char every single time. Very slow, but works. We can improve it later.

	x := C.CString(string(c))
	C.scr_printf(x)
	C.free(unsafe.Pointer(x))
}

func getchar() byte {
	// TODO
	return 0
}

func buffered() int {
	// TODO
	return 0
}

func sleepWDT(period uint8) {
	// TODO
}

func exit(code int) {
  	// This just delegates it to the ps2dev _exit(int) function.
	C._exit(C.int(code))
}

func abort() {
	// TODO
}

func ticksToNanoseconds(ticks timeUnit) int64 {
  	// TODO
	return int64(ticks)
}

func nanosecondsToTicks(ns int64) timeUnit {
  	// TODO
	return timeUnit(ns)
}

func sleepTicks(d timeUnit) {
	// TODO
}

func ticks() (ticksReturn timeUnit) {
	// TODO
	return 0
}
A lot of it is not implemented, and this is intentional - I won’t be using those things at the moment, so I don’t care about them. We can later implement them accordingly, and get them to work as expected. Some of them might be even doable through ps2dev’s C functions, for example.
Interrupts
Another basic file we need is the interrupts defintions - interrupt_ps2.go. I know that ps2dev has implementations for those calls, but I’ve opted to not call them yet. At this moment, we don’t need interrupts, so let’s just implement dummy functions for that:
//go:build ps2

package interrupt

type State uintptr

func Disable() (state State) {
	return 0
}

func Restore(state State) {}

func In() bool {
	return false
}
With that, we should be able to build some Go code. So let’s give it a try.
Calling Go functions from C
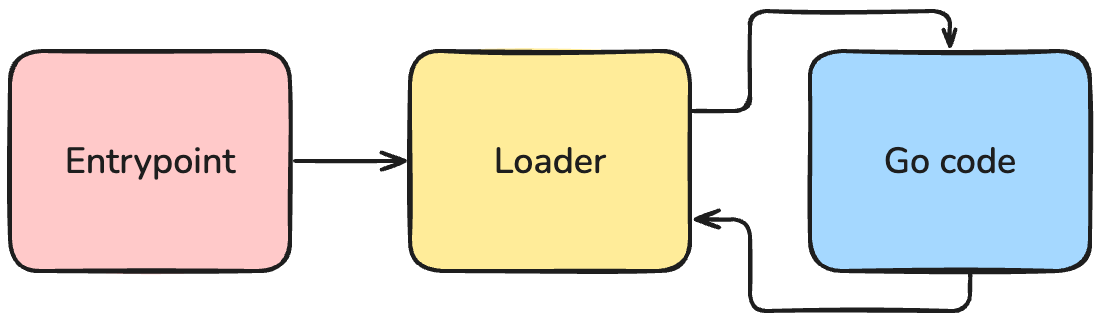
Let’s start with a simple example: get our C code to return a number and a string. Nothing major. We’ll split this into 2 parts: the loader (in C) and our Go code. It will work like this:
Here’s our Go code:
//export aGoString
func aGoString() *C.char {
	return C.CString("The answer for everything is")
}

//export aGoNumber
func aGoNumber() C.int {
	return C.int(42)
}
And our loader, which contains our main function:
// Our go functions, exported before.
extern char* aGoString();
extern int aGoNumber();

int main() {
  // Initialize our debug screen.
  sceSifInitRpc(0);
  init_scr();

  // Print stuff we get from Go functions.
  scr_printf("%s: %d\n", aGoString(), aGoNumber());

  // Infinite loop so we keep the program running.
  while (1) {}

  return 0;
}
Very simple code, right? Let’s build it.
Well, no, wait. There’s a problem. TinyGo, by default, wants you to generate the final ELF (.elf) or the object file (.o) with it. However, the ELF requires adding a linkfile and some other extra bits of code to it, which we’re far from. For now, we just want to get some functions in a way that we can link - so we should be able to just use the object file.
However, attempting to do so generates an incorrect file:
$ tinygo build -target ps2 -o test.o
$ file test.o
test.o: ELF 32-bit LSB relocatable, MIPS, MIPS-III version 1 (SYSV), with debug_info, not stripped
I thought: oh, ok, we’re just missing the proper cflags and ldflags here, right? So let’s try adding it:
{
	// (...)
	"cflags": [
		"-mabi=n32"
	],
	"ldflags": [
		"-mabi=n32"
	],
	// (...)
$ tinygo build -target ps2 -o test.o
$ file test.o
test.o: ELF 32-bit LSB relocatable, MIPS, MIPS-III version 1 (SYSV), with debug_info, not stripped
Oh. Ok then.
Since TinyGo is, for some reason, not playing nice here, I’ve opted for breaking this into steps that I can more easily control. TinyGo internally will generating some LLVM IR from your Go code, and then build it. Let’s stop at the LLVM IR level then:
$ tinygo build -target ps2 -o build/go.ll
This will generate a valid LLVM IR file! 🎉 Now we can just manually build it into the object file with the format we want:
$ clang -fno-pic -c --target=mips64el -mcpu=mips3 -fno-inline-functions -mabi=n32 -mhard-float -mxgot -mlittle-endian -o build/go.o build/go.ll
The flags here are important. Our target is a MIPS64 (only TinyGo is not happy with it), Little Endian, with the MIPS-III instruction set, using the N32 ABI. It uses hardware floating numbers, and the -fno-pic and -mxgot is to deal with a global offset table size limit issue when linking. With all that, here’s what we get:
$ file build/go.o
build/go.o: ELF 32-bit LSB relocatable, MIPS, N32 MIPS-III version 1 (SYSV), with debug_info, not stripped
From here, we can link with our C code. For that, I’ve opted to use the ps2dev linking command (extracted from the Makefile and some testing), with our Go code added into it:
mips64r5900el-ps2-elf-gcc \
	-Tlinkfile \
	-L/usr/local/ps2dev/ps2sdk/ee/lib \
	-L/usr/local/ps2dev/ps2sdk/ports/lib \
	-L/usr/local/ps2dev/gsKit/lib/ \
	-Lmodules/ds34bt/ee/ \
	-Lmodules/ds34usb/ee/ \
	-Wl,-zmax-page-size=128 \
	-lpatches \
	-lfileXio \
	-lpad \
	-ldebug \
	-lmath3d \
	-ljpeg \
	-lfreetype \
	-lgskit_toolkit \
	-lgskit \
	-ldmakit \
	-lpng \
	-lz \
	-lmc \
	-laudsrv \
	-lelf-loader \
	-laudsrv \
	-lc \
	-mhard-float \
	-msingle-float \
	-o build/main.elf \
	build/loader.o \
	build/asm_mipsx.o \
	build/go.o
Note: the
asm_mipsx.ois some assembly code provided by TinyGo that I just copied into the project and built with clang. You can find it here.
And, with that, we build our new application!
$ file build/main.elf
build/main.elf: ELF 32-bit LSB executable, MIPS, N32 MIPS-III version 1 (SYSV), statically linked, with debug_info, not stripped
And running it yields success:
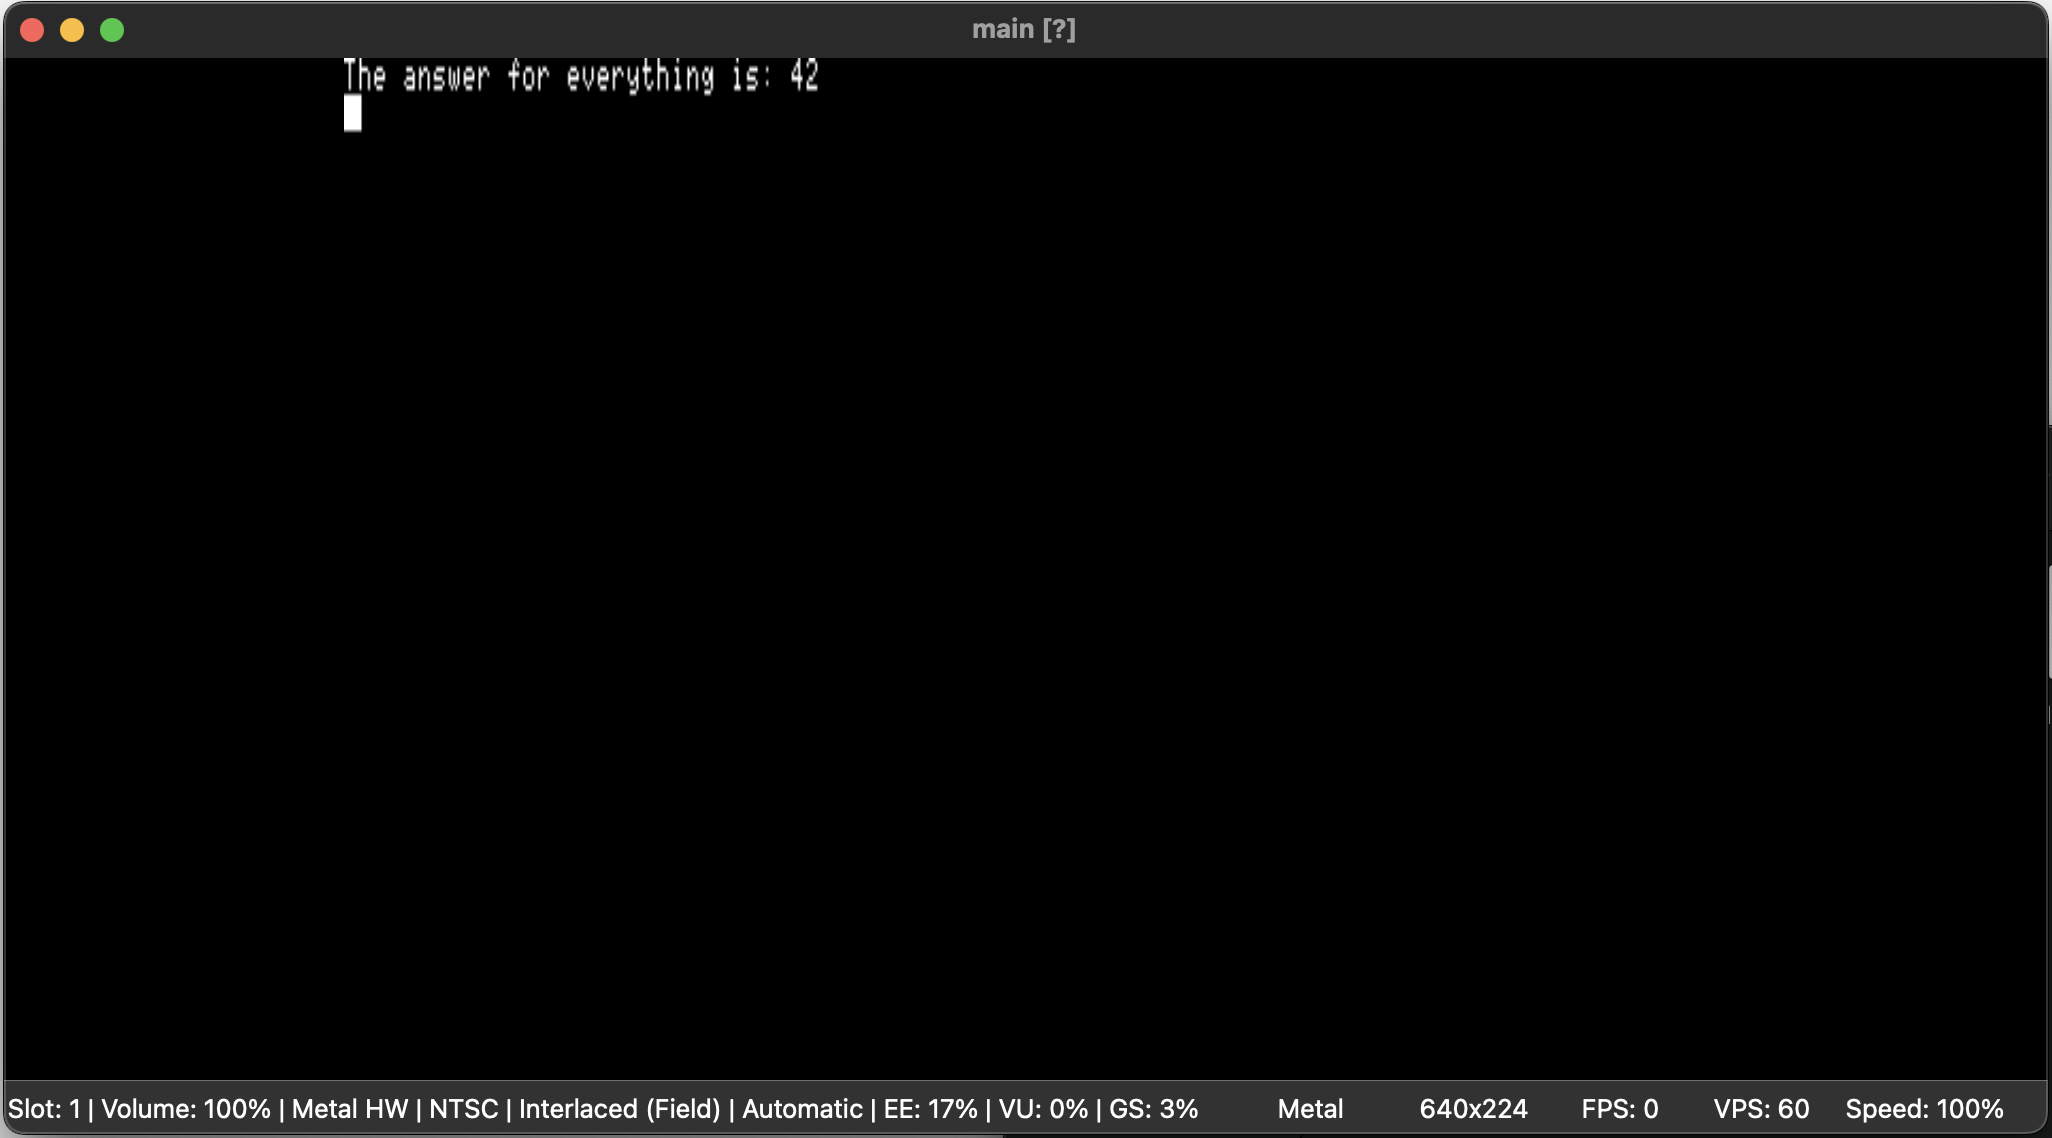
Switching to Go’s main
Right now the main function that is being called is not in Go, but in C - that is what we’ve been calling loader so far. However, Go applications can start by themselves without a C-based loader - and it would be great if our games PS2 applications would so!
Runtime changes
The first step to allowing Go applications to run without our loader is to have the main function exposed by Go. We can do that in our runtime_ps2.go:
//export main
func main() {
	preinit()
	run()
	preexit()
	exit(0)
}

const (
	memSize = uint(24 * 1024 * 1024)
)

var (
	goMemoryAddr uintptr
)

func preinit() {
	// NOTE: no need to clear .bss and other memory areas as crt0 is already doing that in __start.

	// Since we're loading into whatever ps2dev kernel thingy that exists, it's safer for us to do
	// a proper malloc before proceeding. This guarantees that the heap location is ours. We will
	// need to free it later on though.

	goMemoryAddr = uintptr(unsafe.Pointer(C.malloc(C.uint(memSize))))
	heapStart = goMemoryAddr
	heapEnd = goMemoryAddr + uintptr(memSize)
}

func preexit() {
	C.free(unsafe.Pointer(heapStart))
}
There are some important things to note here:
- The heap start and end could be defined by the linker file. And, ironically, they are. However, the
crt0provided by ps2dev will clear those variables for some reason, making it kinda broken.- We could just assume that anything above a certain memory address is ours, buuuut ps2dev may want to play with more memory and I don’t want to deal with this right now.
- We’ll allocate the memory using ps2dev’s
mallocas per stated in the code. This will guarantee that this memory area is ours - if the libraries need more, they should still have some memory left, as the PS2 should have 32MB and we’re allocating 24MB only. - Technically speaking we could make the heap grow per demand - but that’s a problem for future me.
- We’ll intentionally unallocate the memory after usage. Not really required, but just in case.
- The
runfunction is responsible for calling ourmainfunction inside ourmainpackage. This is not something we need to deal with - TinyGo’s code does that for us, we just need to call it.
It works basically like this:
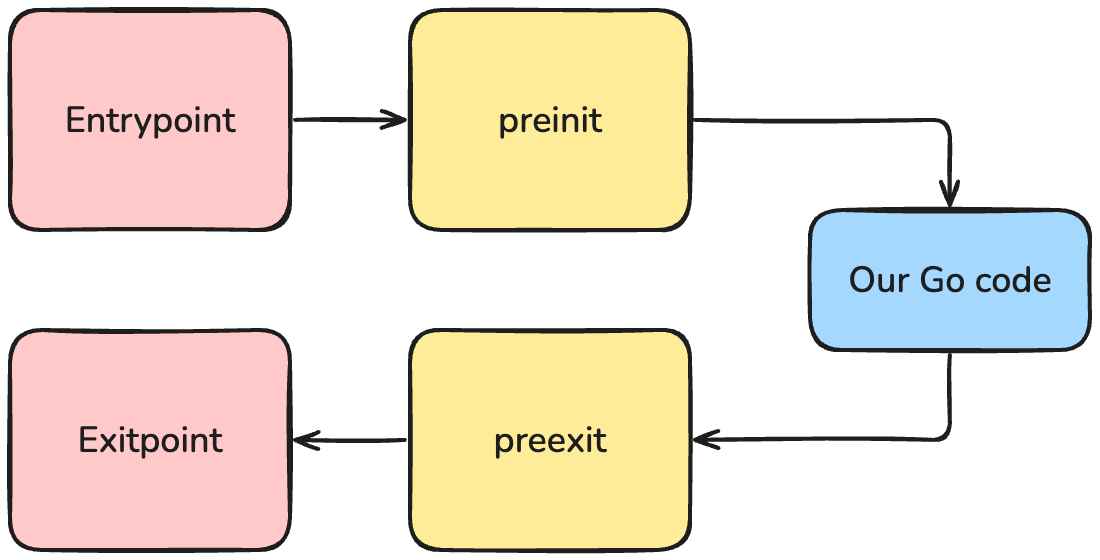
This is technically a mixed approach: it’s both baremetal - because it runs without a proper OS - but it’s also not - because it allocates memory, enters and exits application.
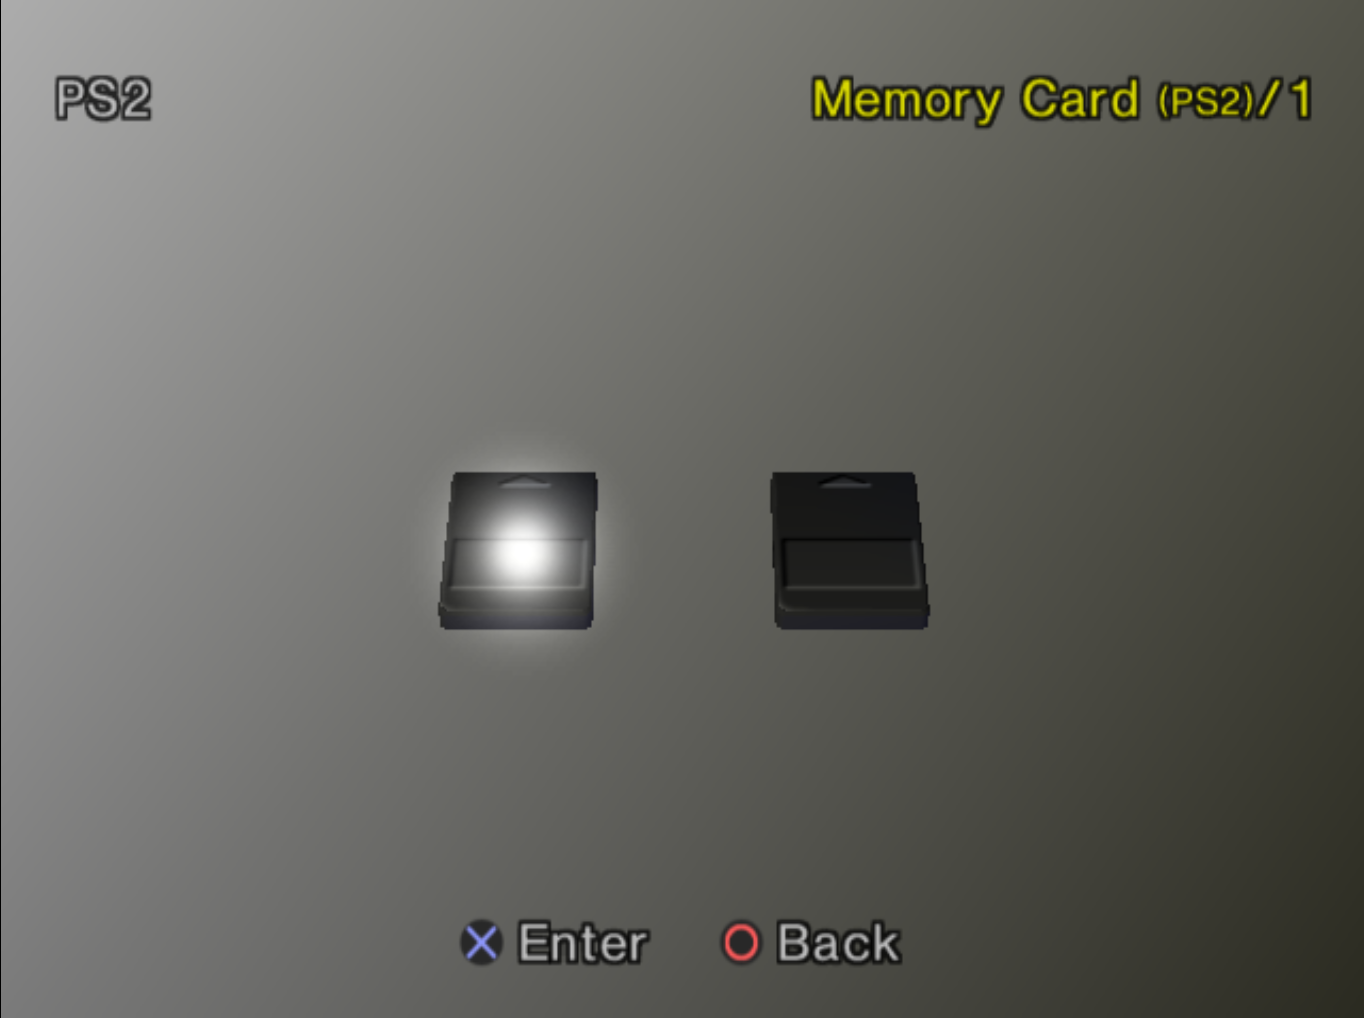
Fun fact: once the code exits, it shows the memory card selection screen!
Our Go code
Let’s code something in Go then. First step is to have something to call, so let’s create a package called debug with the debug screen functions:
package debug

/*
extern void free(void *ptr);
extern void sceSifInitRpc(int mode);
extern void init_scr(void);
extern void scr_printf(const char *format, ...);
*/
import "C"
import (
	"fmt"
	"unsafe"
)

func Init() {
	C.sceSifInitRpc(0)
	C.init_scr()
}

func Printf(format string, args ...interface{}) {
	formatted := fmt.Sprintf(format, args...)

	str := C.CString(formatted)
	C.scr_printf(str)
	C.free(unsafe.Pointer(str))
}
Yes, there is an
externfor thefreefunction which could be replaced by stdlib. I’ve avoided that at the moment as that requires adding some C flags for include paths and that made it messy. Here’s how it looks like with it:/* #cgo CFLAGS: -I/Users/ricardo/dev/ps2dev/ee/mips64r5900el-ps2-elf/include -I/Users/ricardo/dev/ps2dev/ee/lib/gcc/mips64r5900el-ps2-elf/14.2.0/include/ -I/Users/ricardo/dev/ps2dev/gsKit/include -I/Users/ricardo/dev/ps2dev/ps2sdk/common/include -I/Users/ricardo/dev/ps2dev/ps2sdk/ports/include/freetype2 -I/Users/ricardo/dev/ps2dev/ps2sdk/ports/include/zlib #include <stdlib.h> extern void sceSifInitRpc(int mode); extern void init_scr(void); extern void scr_printf(const char *format, ...); */This can be improved by moving those flags externally to the build process but that’s a problem for future me once this gets released.
Overall, this is nothing too crazy - it’s just the normal debug functions exposed by ps2dev (declared here and implemented here). And then we just call it:
package main

import (
	"ps2go/debug"
)

func main() {
	debug.Init()

	debug.Printf("Hello world from Go!\n")
	debug.Printf(`
   ____                                _
  / ___| ___    _ __ _   _ _ __  _ __ (_)_ __   __ _    ___  _ __
 | |  _ / _ \  | '__| | | | '_ \| '_ \| | '_ \ / _' |  / _ \| '_ \
 | |_| | (_) | | |  | |_| | | | | | | | | | | | (_| | | (_) | | | |
  \____|\___/  |_|   \__,_|_| |_|_| |_|_|_| |_|\__, |  \___/|_| |_|
    ____  _             ____  _        _   _   |___/       ____
   |  _ \| | __ _ _   _/ ___|| |_ __ _| |_(_) ___  _ __   |___ \
   | |_) | |/ _' | | | \___ \| __/ _' | __| |/ _ \| '_ \    __) |
   |  __/| | (_| | |_| |___) | || (_| | |_| | (_) | | | |  / __/
   |_|   |_|\__,_|\__, |____/ \__\__,_|\__|_|\___/|_| |_| |_____|
                  |___/
`)
	for {
		// Infinite loop to not exit!
	}
}
Fancy, no? Let’s build the code and see what happens:
$ tinygo build -target ps2 -o build/go.ll
$ clang -fno-pic -c --target=mips64el -mcpu=mips3 -fno-inline-functions -mabi=n32 -mhard-float -mxgot -mlittle-endian -o build/go.o build/go.ll
$ mips64r5900el-ps2-elf-gcc \
	-Tlinkfile \
	-L/usr/local/ps2dev/ps2sdk/ee/lib \
	-L/usr/local/ps2dev/ps2sdk/ports/lib \
	-L/usr/local/ps2dev/gsKit/lib/ \
	-Lmodules/ds34bt/ee/ \
	-Lmodules/ds34usb/ee/ \
	-Wl,-zmax-page-size=128 \
	-lpatches \
	-lfileXio \
	-lpad \
	-ldebug \
	-lmath3d \
	-ljpeg \
	-lfreetype \
	-lgskit_toolkit \
	-lgskit \
	-ldmakit \
	-lpng \
	-lz \
	-lmc \
	-laudsrv \
	-lelf-loader \
	-laudsrv \
	-lc \
	-mhard-float \
	-msingle-float \
	-o build/main.elf \
	build/asm_mipsx.o \
	build/go.o
That builds the ELF file. Now let’s load it in the emulator and see what happens!
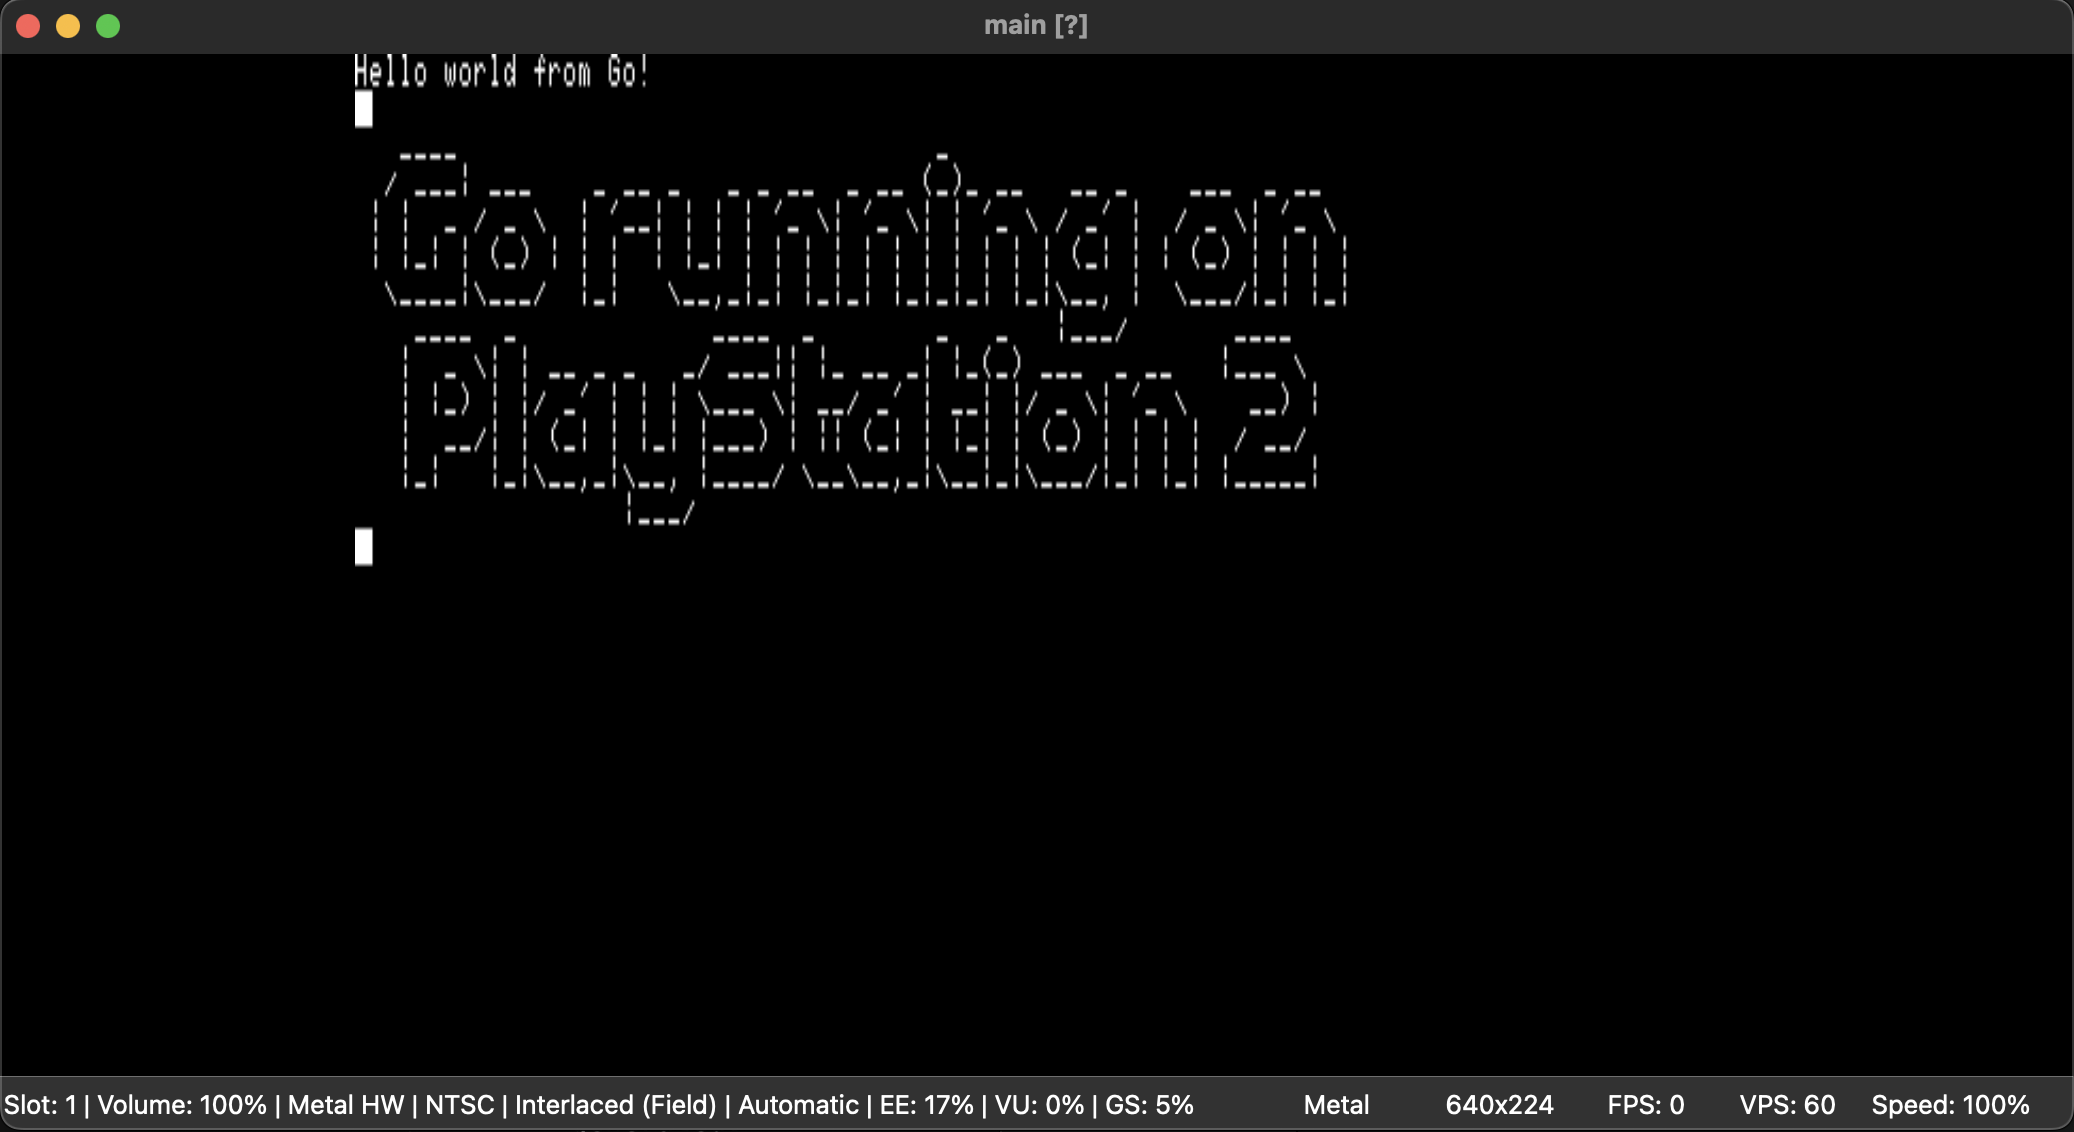
Success! 🎉

The DDIVU problem
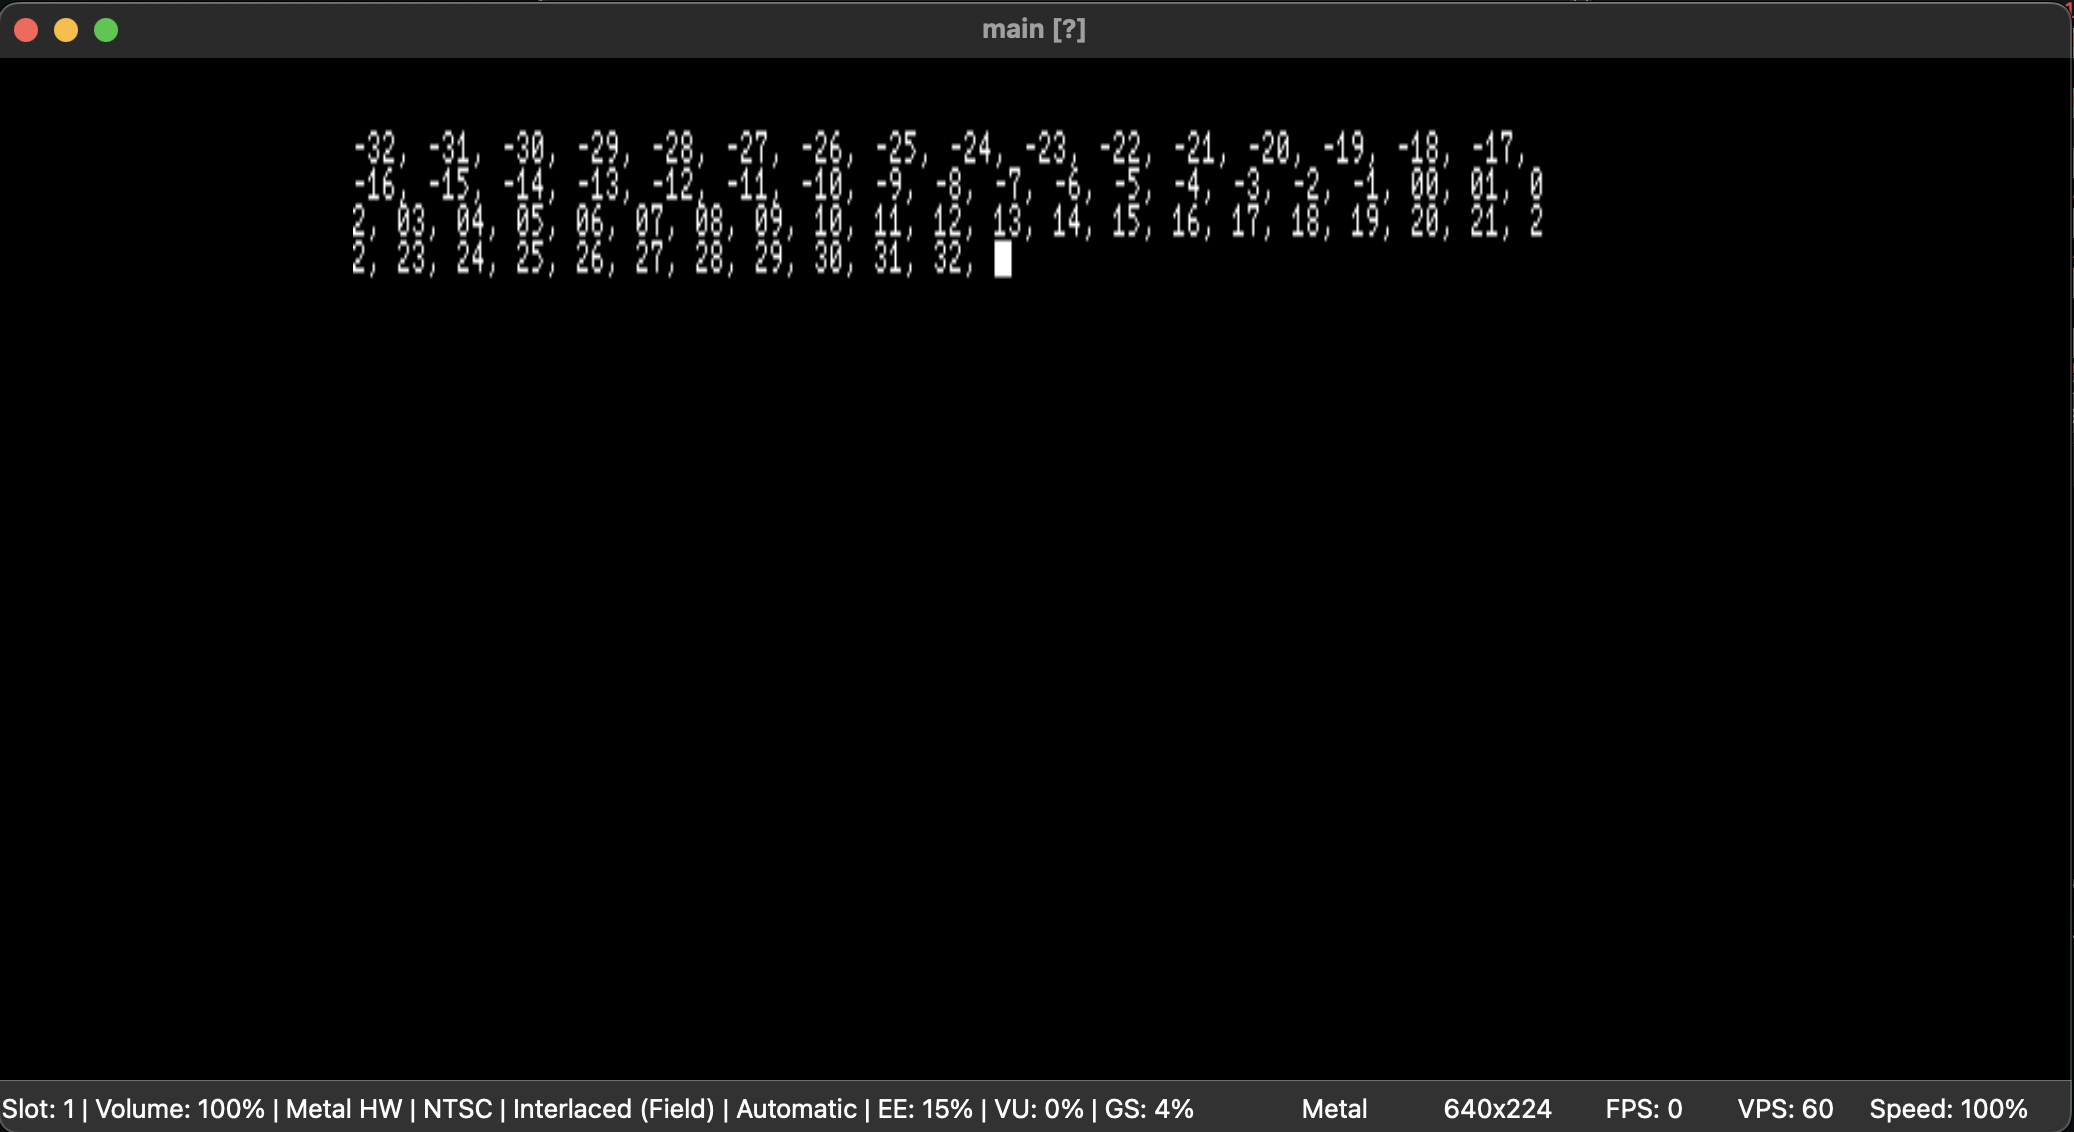
While testing some basic functionality, I’ve noticed that fmt.Sprintf didn’t work properly. Look at this very simple basic code:
func main() {
	debug.Init()

	for i := -32; i <= 32; i++ {
		debug.Printf("%02d, ", i)
	}

	for {
		// Infinite loop to not exit!
	}
}
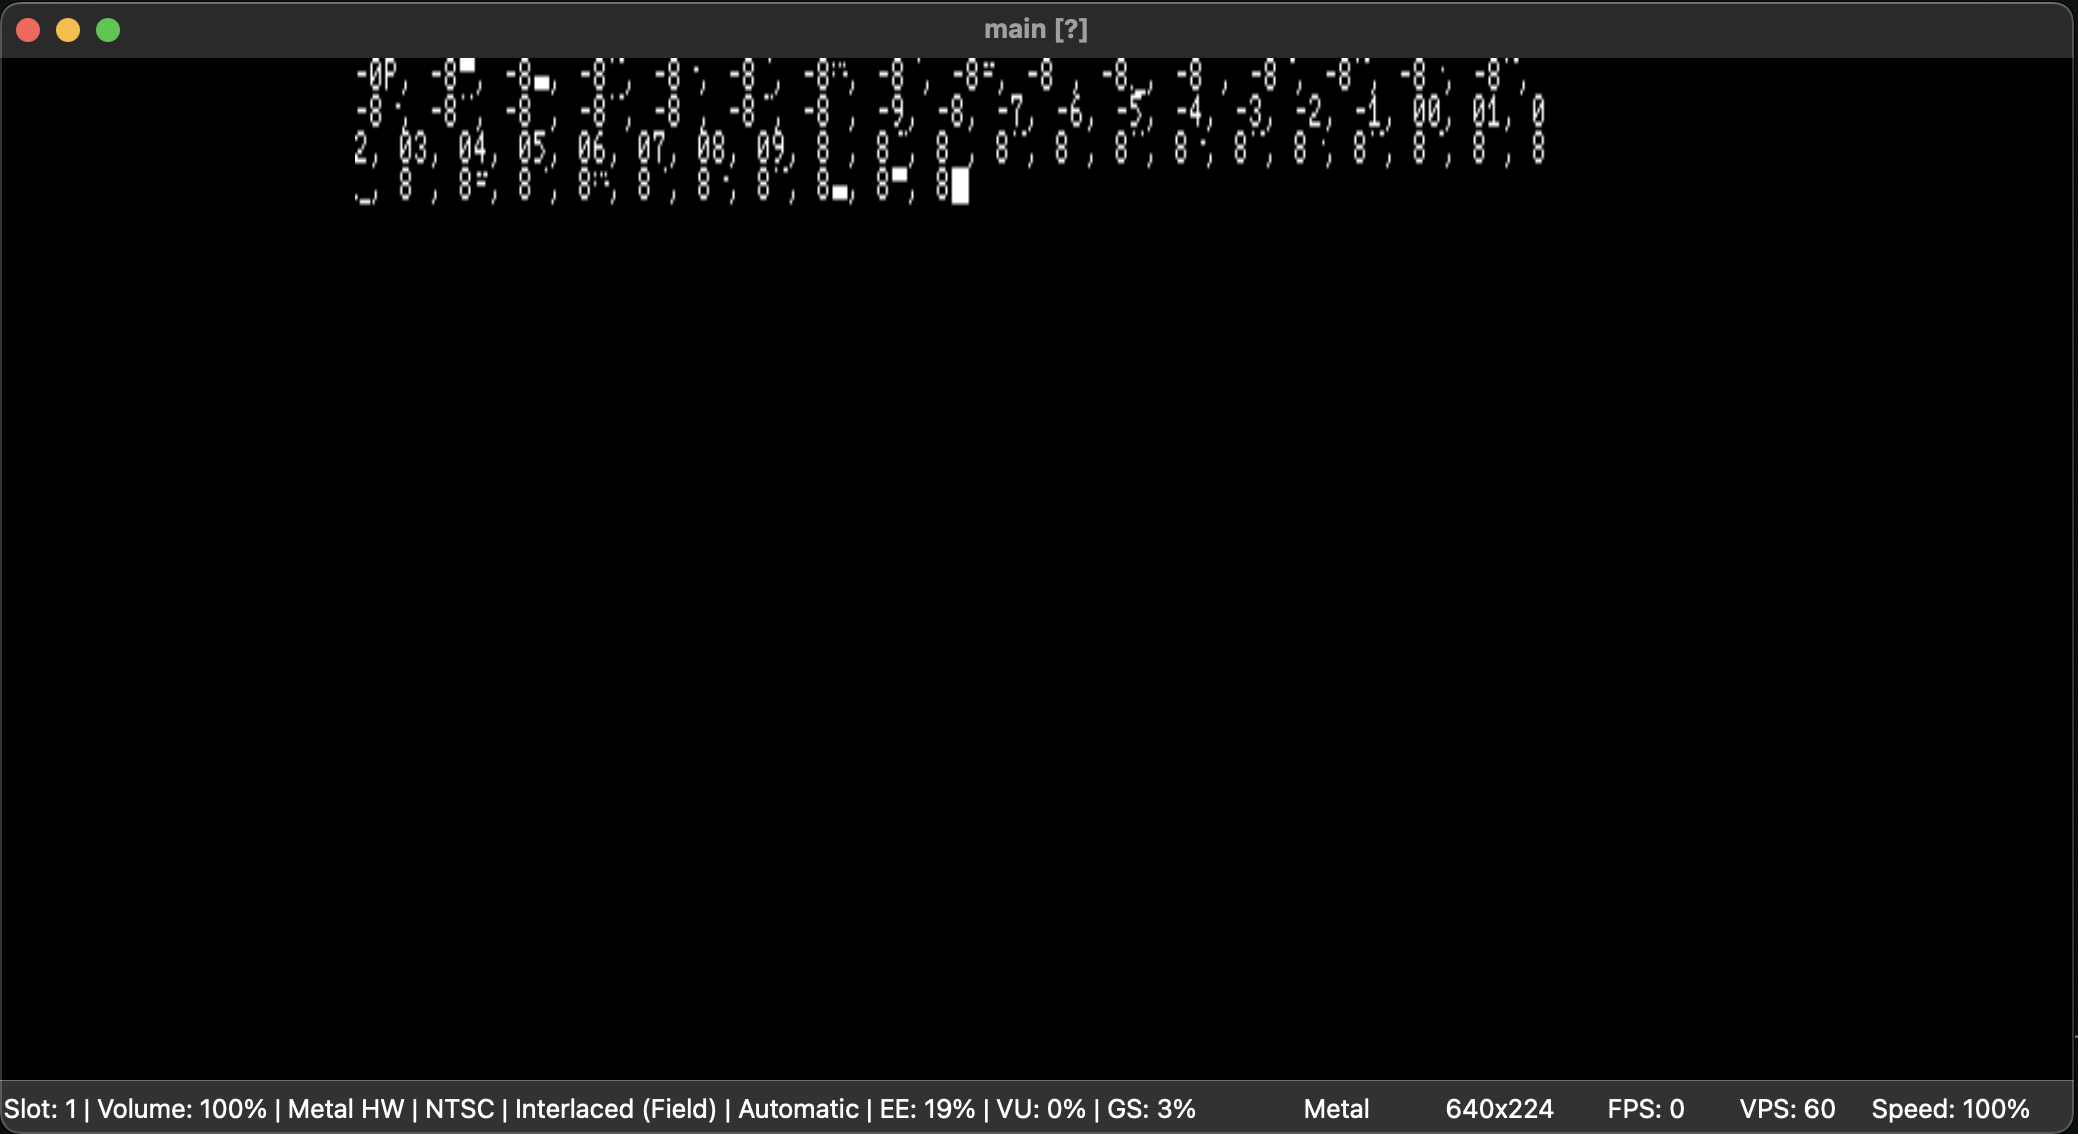
Ok, this is not normal. The numbers between -9 and +9 are correct, while everything else is wrong. This specific problem took me days to figure out what the hell was going on. I eventually narrowed it down to this part of the fmtInteger implementation, used by Sprintf inside the fmt package:
func (f *fmt) fmtInteger(u uint64, base int, isSigned bool, verb rune, digits string) {
	// (... bunch of code here ...)

	switch base {
	case 10:
		for u >= 10 {
			i--
			next := u / 10
			buf[i] = byte('0' + u - next*10)
			u = next
		}

	// (... bunch of code here ...)
}
Look at how TinyGo is generating the LLVM IR code for that:
!875 = !DIFile(filename: "format.go", directory: "/usr/local/go/src/fmt")
!15696 = !DILocalVariable(name: "next", scope: !15679, file: !875, line: 243, type: !373)

; (...)

lookup.next:                                      ; preds = %for.body
  %31 = udiv i64 %27, 10, !dbg !15759
    #dbg_value(i64 %31, !15696, !DIExpression(), !15757)
  %.neg = mul i64 %31, 246, !dbg !15760
  %32 = add i64 %27, 48, !dbg !15761
  %33 = add i64 %32, %.neg, !dbg !15762
  %34 = trunc i64 %33 to i8, !dbg !15763
  %35 = getelementptr inbounds i8, ptr %.pn75, i32 %30, !dbg !15758
  store i8 %34, ptr %35, align 1, !dbg !15758
    #dbg_value(i64 %31, !15696, !DIExpression(), !15764)
    #dbg_value(i64 %31, !15684, !DIExpression(), !15765)
  br label %for.loop, !dbg !15700
Which all seems just fine. Looking deeper into it, there’s this specific thing: udiv i64 %27, 10 - this is a unsigned division of a 64bit integer by 10. Keep that 64bit part in mind.
This generates the following MIPS assembly code:
.LBB139_23:                             # %lookup.next
                                        #   in Loop: Header=BB139_19 Depth=1
	#DEBUG_VALUE: (*fmt.fmt).fmtInteger:i <- [DW_OP_plus_uconst 176] [$sp+0]
	#DEBUG_VALUE: (*fmt.fmt).fmtInteger:u <- [DW_OP_plus_uconst 184] [$sp+0]
	#DEBUG_VALUE: (*fmt.fmt).fmtInteger:negative <- [DW_OP_plus_uconst 332] [$sp+0]
	#DEBUG_VALUE: (*fmt.fmt).fmtInteger:digits <- [DW_OP_LLVM_fragment 32 32] 17
	#DEBUG_VALUE: (*fmt.fmt).fmtInteger:base <- [DW_OP_plus_uconst 316] [$sp+0]
	#DEBUG_VALUE: (*fmt.fmt).fmtInteger:verb <- [DW_OP_plus_uconst 312] [$sp+0]
	#DEBUG_VALUE: (*fmt.fmt).fmtInteger:digits <- [DW_OP_plus_uconst 308, DW_OP_LLVM_fragment 0 32] [$sp+0]
	.loc	129 0 7 is_stmt 0               # format.go:0:7
	lw	$1, 176($sp)                    # 4-byte Folded Reload
	lw	$4, 272($sp)                    # 4-byte Folded Reload
	ld	$3, 184($sp)                    # 8-byte Folded Reload
	daddiu	$2, $zero, 10
	.loc	129 243 14 is_stmt 1            # format.go:243:14
	ddivu	$zero, $3, $2
	teq	$2, $zero, 7
	mflo	$2
Let’s ignore most of this and focus on one specific thing: ddivu $zero, $3, $2. Looks correct, right?
Well… let’s look into how PCSX2 loads this:
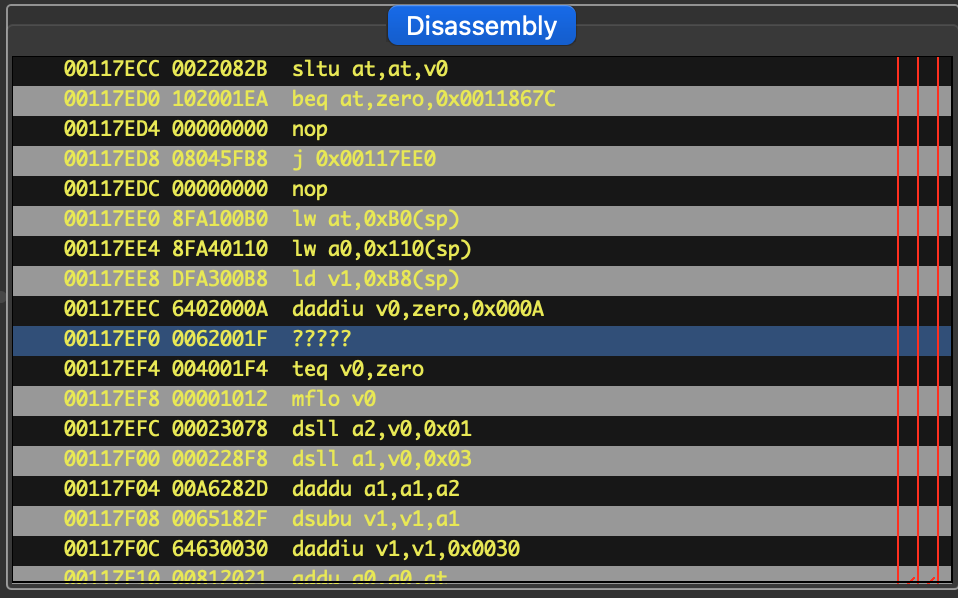
Yep. PCSX2 doesn’t see the DDIVU instruction. Or, more specifically, the PlayStation doesn’t see it.
The DDIVU (doubleword divide unsigned) is a instruction defined in MIPS-III (source) responsible for doing the division of 2 unsigned 64bit integers.
However, that doesn’t work in the PS2, as we saw before. You see, the DDIVU instruction is not defined (source) in the PS2 MIPS instruction set - only DIVU is. This introduces a major problem, as now all int64 (with DDIV) and uint64 (with DDIVU) divisions won’t execute - or will execute incorrectly if it ends up matching some other instruction. We need to avoid that, and either split this division inside the Go compiler in a way that would not do the 64bit version of it, or modify the LLVM so that it won’t use this instruction, even on a mips3 CPU. Or maybe we can implement a custom CPU inside the LLVM - the r5900, like ps2dev’s GCC.
Finding a way out
My first thought was “oh, let’s adapt this in the LLVM”. But, and I’m not gonna lie to you, changing that code is hell. It’s very complex and requires a ton of changes and most of the time it even requires full rebuild of the LLVM project. I’m just too lazy for that. So I’ve opted for the terrible approach of doing this inside TinyGo’s compiler.
The first step is to have a 64bit division code. According to my good friend ChatGPT (who has never been wrong before /s), whenever 64bit division is not available (like in the R5900), GCC uses an auxiliary function called __udivdi3:
uint64_t __udivdi3(uint64_t a, uint64_t b);
So my thought was: oh, I can just map the uint64 division to this then. The first step is to add this as something that is available on our runtime_ps2.go (because I’m too lazy to do the full proper call):
//go:build ps2

package runtime

/*
extern long __divdi3(long a, long b);
extern unsigned long __udivdi3 (unsigned long a, unsigned long b);
extern long __moddi3(long a, long b);
extern unsigned long __umoddi3(unsigned long a, unsigned long b);
*/
import "C"

func int64div(a, b int64) int64 {
	return int64(C.__divdi3(C.long(a), C.long(b)))
}

func uint64div(a, b uint64) uint64 {
	return uint64(C.__udivdi3(C.ulong(a), C.ulong(b)))
}

func int64mod(a, b int64) int64 {
	return int64(C.__moddi3(C.long(a), C.long(b)))
}

func uint64mod(a, b uint64) uint64 {
	return uint64(C.__umoddi3(C.ulong(a), C.ulong(b)))
}
Then, we need to modify TinyGo’s compiler to use it. That is simpler than it sounds - it’s all handled here.
Let’s start with the unsigned operations:
if op == token.QUO {
	return b.CreateUDiv(x, y, ""), nil
} else {
	return b.CreateURem(x, y, ""), nil
}
will then become:
if op == token.QUO {
	if (x.Type().TypeKind() == llvm.IntegerTypeKind && x.Type().IntTypeWidth() == 64) ||
		(y.Type().TypeKind() == llvm.IntegerTypeKind && y.Type().IntTypeWidth() == 64) {
		return b.createRuntimeCall("uint64div", []llvm.Value{x, y}, ""), nil
	} else {
		return b.CreateUDiv(x, y, ""), nil
	}
} else {
	if (x.Type().TypeKind() == llvm.IntegerTypeKind && x.Type().IntTypeWidth() == 64) ||
		(y.Type().TypeKind() == llvm.IntegerTypeKind && y.Type().IntTypeWidth() == 64) {
		return b.createRuntimeCall("uint64mod", []llvm.Value{x, y}, ""), nil
	} else {
		return b.CreateURem(x, y, ""), nil
	}
}
Then we just rebuild the TinyGo’s compiler with a make, and rebuild our application. Let’s retest our previous code:
And for our int64 operations as well please. From the following code:
if op == token.QUO {
	return b.CreateSDiv(x, y, ""), nil
} else {
	return b.CreateSRem(x, y, ""), nil
}
we adapt it into this:
if op == token.QUO {
	if (x.Type().TypeKind() == llvm.IntegerTypeKind && x.Type().IntTypeWidth() == 64) ||
		(y.Type().TypeKind() == llvm.IntegerTypeKind && y.Type().IntTypeWidth() == 64) {
		return b.createRuntimeCall("int64div", []llvm.Value{x, y}, ""), nil
	} else {
		return b.CreateSDiv(x, y, ""), nil
	}
} else {
	if (x.Type().TypeKind() == llvm.IntegerTypeKind && x.Type().IntTypeWidth() == 64) ||
		(y.Type().TypeKind() == llvm.IntegerTypeKind && y.Type().IntTypeWidth() == 64) {
		return b.createRuntimeCall("int64mod", []llvm.Value{x, y}, ""), nil
	} else {
		return b.CreateSRem(x, y, ""), nil
	}
}
Finally, we can test our changes by doing this:
debug.Printf("\n\n")
for i := int64(-8); i <= 8; i++ {
	debug.Printf("%02d | div02 = %02d | mod04 = %02d\n", i, i/2, i%4)
}
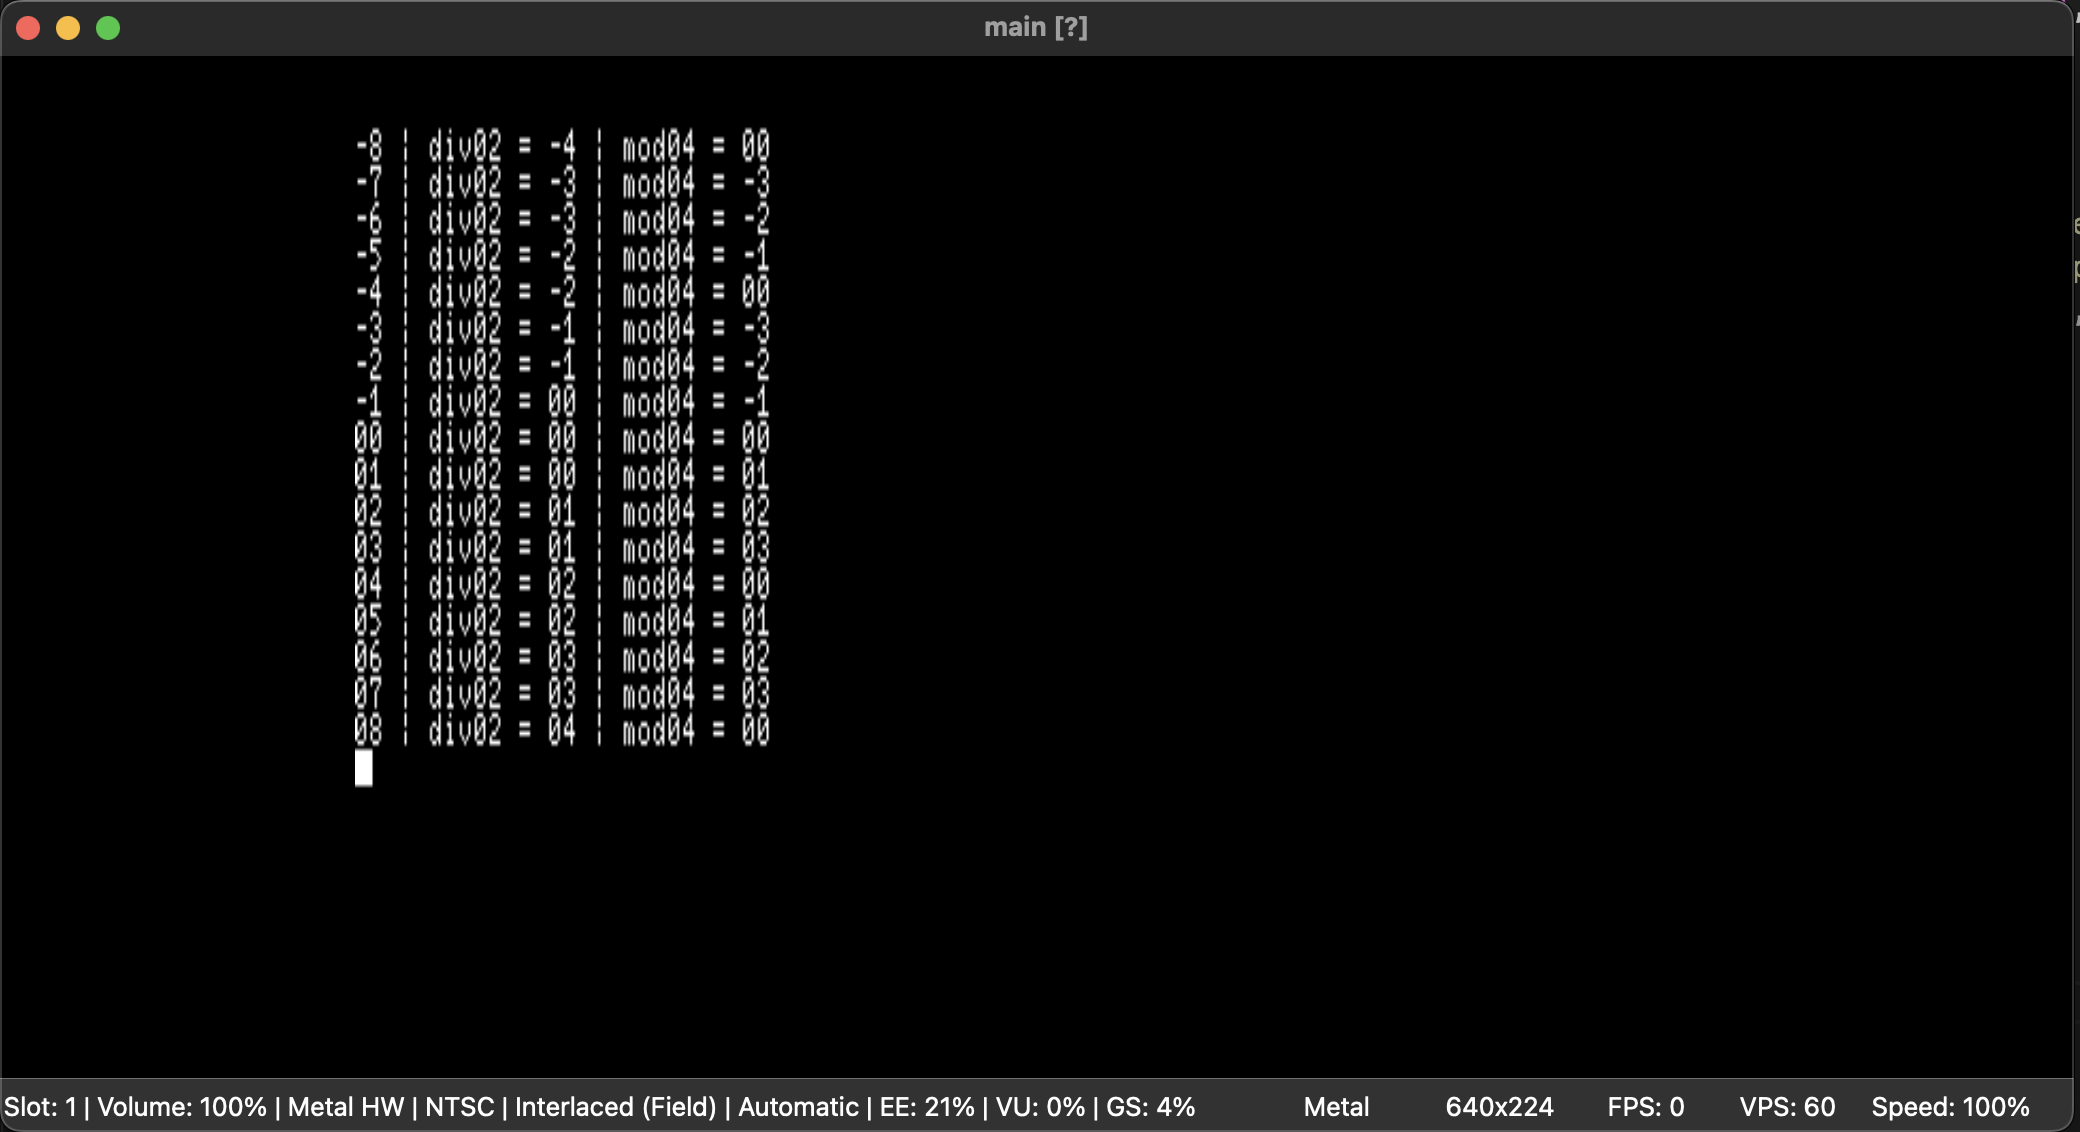
And with that, we’re done for the 64bit integer problem! Yey!
Yes, I know, there might be other instructions that are not implemented. Not looking into this now for sure. Also, yes, I didn’t get big-ass numbers, but also I don’t need them now.
Spoiler: not doing this on the LLVM level will bite our asses in the future.
What now?
Well, now we need to keep pushing forward! But I need to stop this post at some point so that people can catch up with this project, and also so I can publish these findings. But there’s a lot still to get done:
- Target-specific things, such as syscalls, inline assembly and interrupt support
- Floating points as they are non-functional at the moment
- New LLVM MIPS CPU - yes, we’ll probably need that, plus this way we can avoid hacking code inside TinyGo’s compiler
- Everything else we want!
You may be wondering, “what can I do with it now”? Well, you can do whatever you want, actually. You can call ps2dev’s libraries and play with them, and if something fails, you can just call C code from Go. But your code will be running from the Go side of things first, which is pretty neat in my opinion - even if a bit limited for now.
I’m already working on the next part of this project though, so stay tuned! See you around!